
Your closet is not the problem — the system inside it is. Most people are working with dead vertical space, tangled accessories, and shelves that were designed for someone else’s life. The good news? You don’t need a full renovation or a designer budget to fix it. Whether you’re dealing with a tiny reach-in or a sprawling walk-in that somehow still feels chaotic, the right organization system can literally double your usable space. These 27 real-world solutions range from under $10 DIY hacks to simple reconfigurations you can do in a weekend — no contractor required.
1. Double Your Rod Space With a Second Hanging Bar
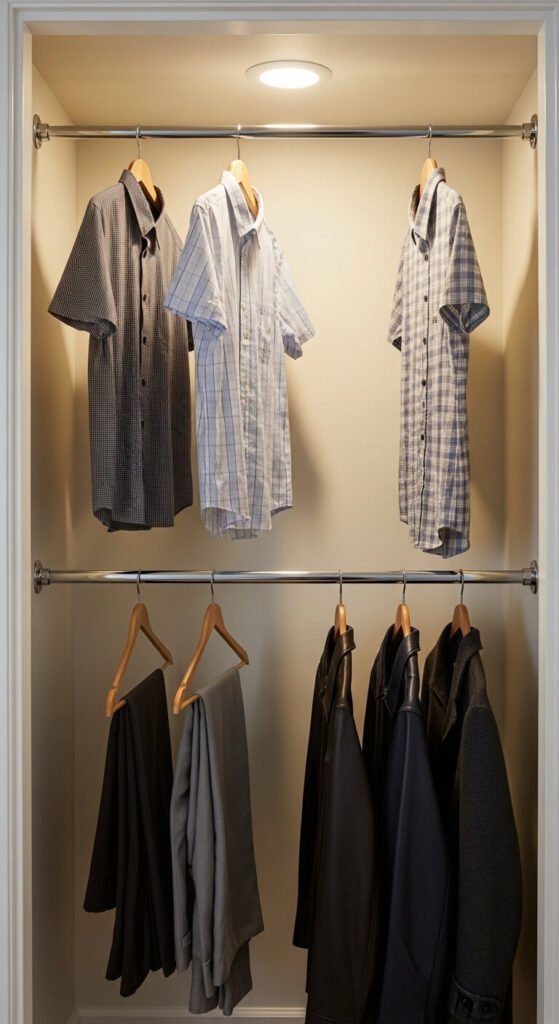
Most closets ship with one rod — and that’s wasted potential.
A second hanging rod drops below the first and instantly creates two rows of hanging space.
Perfect for shirts, jackets, folded pants, and kids’ clothes.
You can buy a drop-down rod extender for under $15 at any home store.
Or DIY it: hang a spare rod using S-hooks and a length of chain.
Takes about 10 minutes. Zero tools needed.
Best for: short items like tops, blazers, and folded trousers.
2. Stack Shelf Risers to Multiply Flat Storage
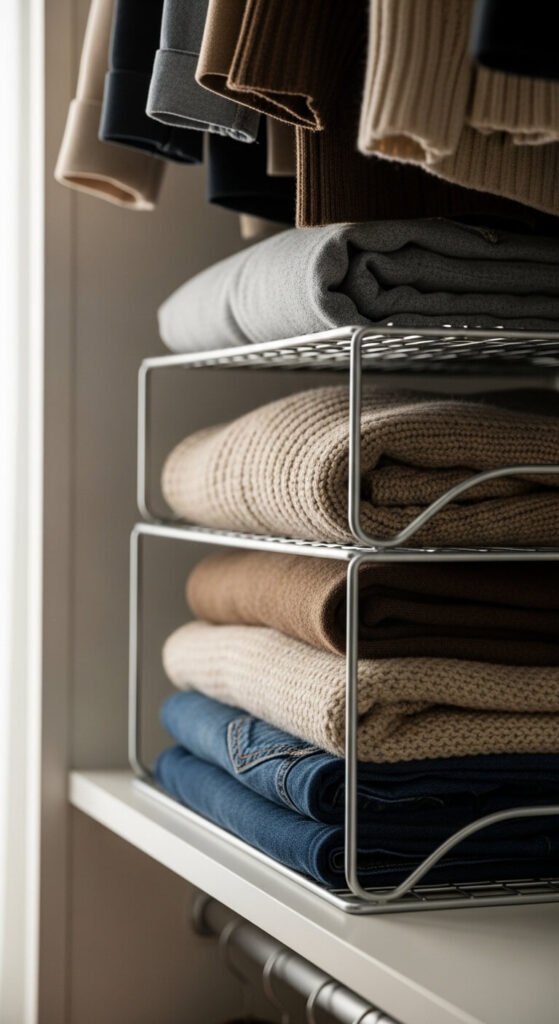
Flat shelves have one usable surface. Shelf risers give you two.
These small metal or wood frames sit on top of your existing shelf and create an upper deck for folded items.
Stack sweaters below, t-shirts above.
Or use them in your linen closet for towels and sheets.
Risers cost $10–$20 and require zero installation.
Available in wire, bamboo, or coated metal.
Pro tip: pair two risers side-by-side to cover the full width of a shelf.
3. Hang a Shoe Organizer Over the Door
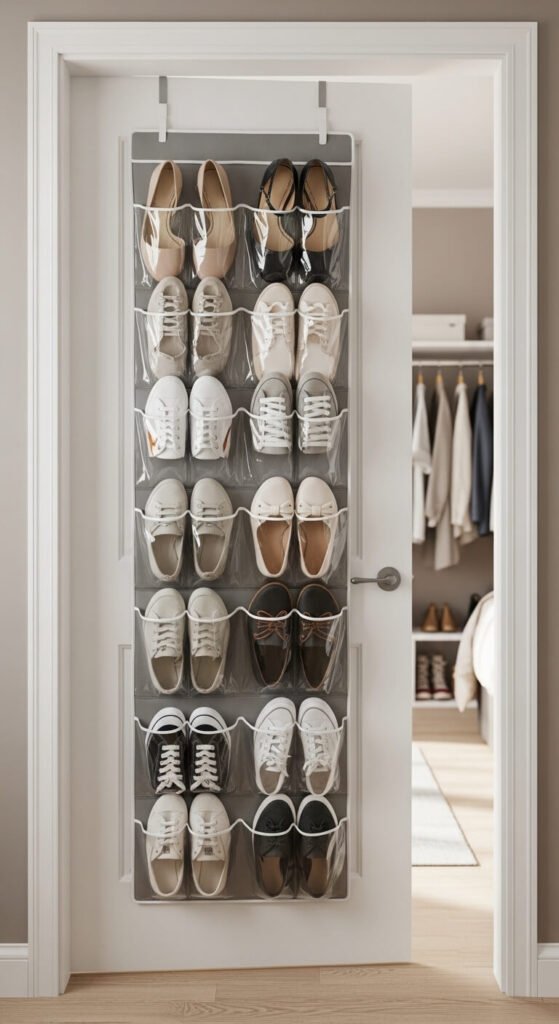
The back of your closet door is prime real estate — and most people leave it empty.
An over-door shoe organizer can hold 20–30 pairs without touching the floor.
No drilling. No damage. Just hooks over the door.
They also work for accessories, cleaning supplies, and kids’ toys.
Clear pockets let you see everything at a glance.
Cost: under $20.
You can also store folded scarves, belts, and sunglasses in the pockets.
4. Install Modular Cube Shelving Along One Wall
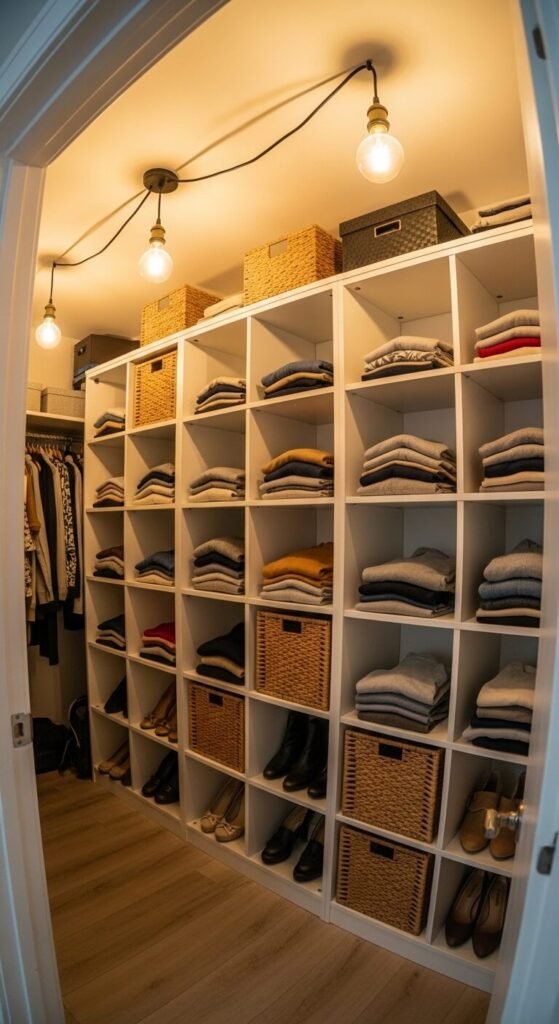
Modular cube units are the most flexible storage system available.
You pick the configuration, swap it as your needs change, and add cubes over time.
IKEA’s Kallax line starts around $60 for a 4-cube unit.
Line an entire wall for a custom-built look on a flat-pack budget.
Use open cubes for shoes and folded items.
Add fabric bins for items you want hidden.
Bonus: they work as room dividers in studio apartments.
5. Use Slim Velvet Hangers to Reclaim Inches

Standard plastic hangers are thick, bulky, and a space drain.
Swapping them for slim velvet hangers is one of the easiest wins in closet organization.
Velvet hangers are about 0.2 inches thick — versus nearly 0.6 for plastic.
That adds up fast. A 30-inch rod can hold nearly double the items.
Clothes also stay put. No more slipping.
A set of 50 costs around $10–$15.
Do it in one afternoon: pull everything out, rehang with new hangers, and watch the rod breathe.
6. Add a Tension Rod Under Shelves for Extra Hanging
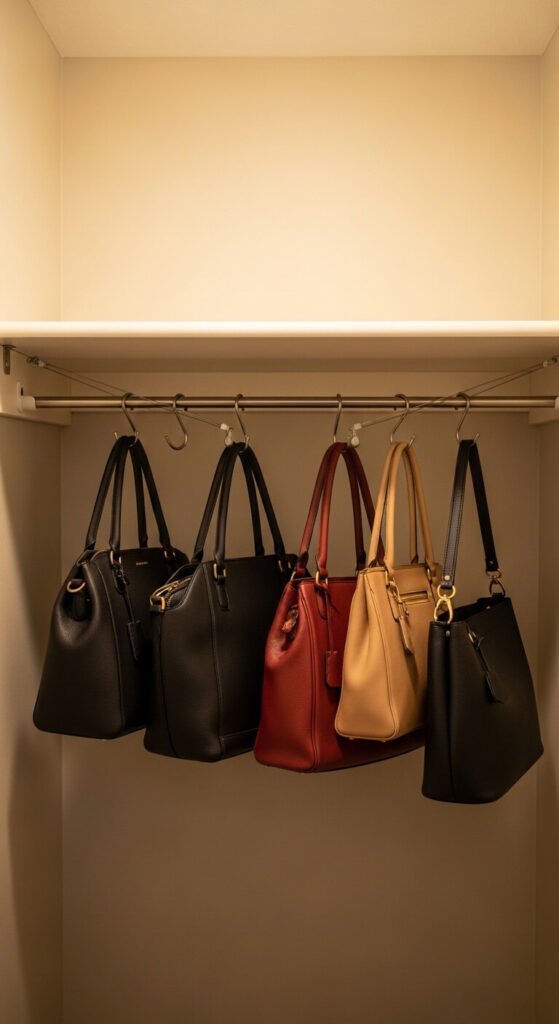
Got a gap under a shelf that’s just dead air?
A tension rod slides between two walls and creates an instant hanging bar.
No screws. No damage. Adjustable to fit your exact width.
Hang purses with S-hooks, scarves on rings, or short clothing items directly.
Works in closets, under bathroom sinks, inside kitchen cabinets.
Tension rods cost $5–$12.
Best trick: hang a second tension rod horizontally in a tall closet to section off zones for different clothing types.
7. Mount Pegboard for a Fully Adjustable Wall System
Pegboard is the most underrated closet tool in existence.
Mount a 2×4-foot sheet on a side wall or door.
Add hooks, baskets, and shelves wherever you want them.
Rearrange anytime — no patching, no damage.
Great for accessories, bags, hats, and jewelry.
Pegboard sheets run $15–$25 at hardware stores.
Paint it to match your walls and it looks intentional and built-in.
DIY tip: add 1-inch spacers behind the board so hooks have room to insert properly.
8. Use Vertical Dividers for Shelved Items Like Bags and Clutches
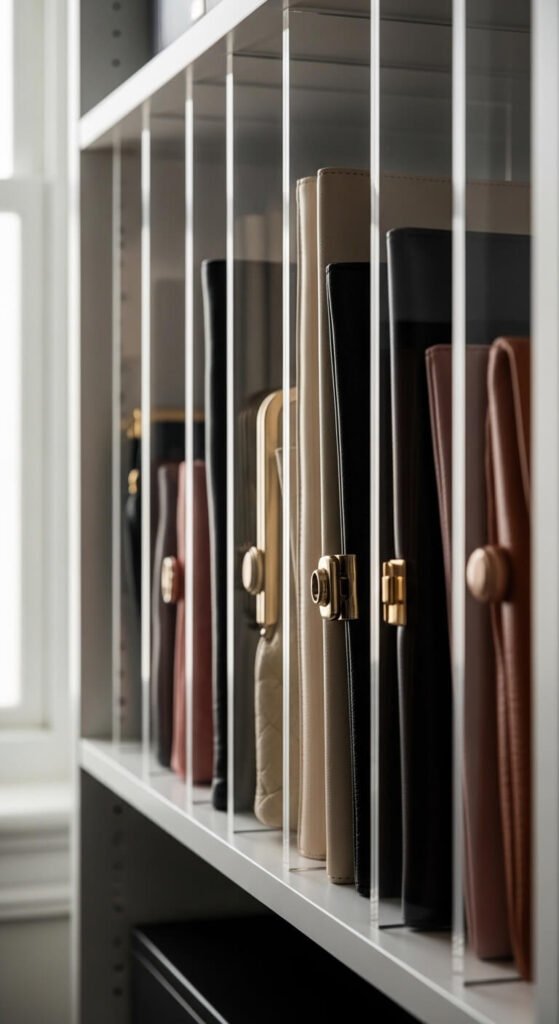
Bags and clutches tip over. They fall. They pile.
Vertical shelf dividers fix this by creating individual upright slots for each item.
Set them 4–6 inches apart and stand bags upright like books on a shelf.
Works equally well for folded jeans, clutch purses, and stacked sweaters.
Acrylic or metal dividers cost $15–$25 for a set.
You can also DIY with strips of thin plywood cut to shelf height.
Result: every item visible, accessible, and standing on its own.
9. Hang a Three-Tier Hanging Organizer for Folded Clothes
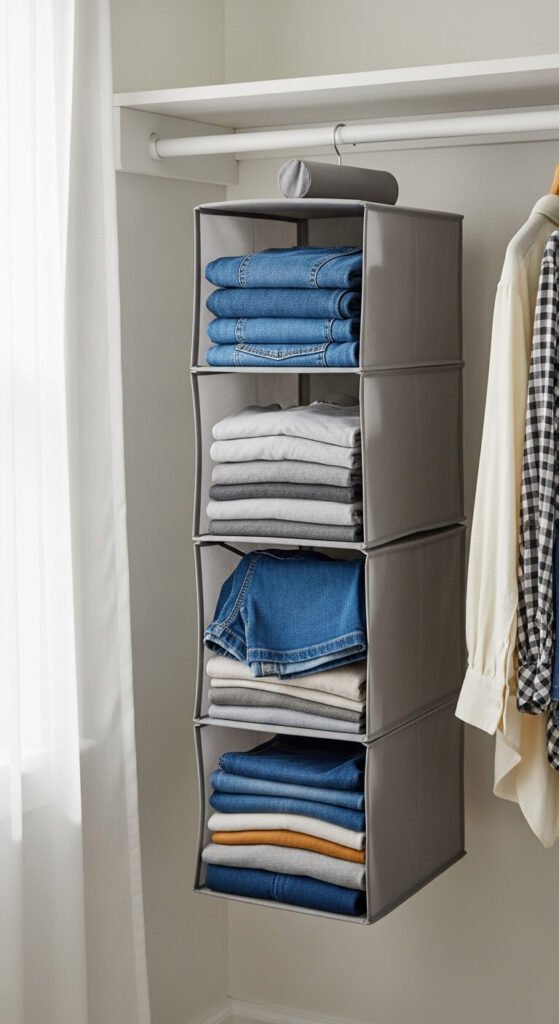
These fabric cubbies hang directly from your existing rod.
Each tier holds folded shirts, jeans, sweaters, or even shoes.
They take up one hanger’s worth of rod space but give you 3–5 storage compartments.
Great for folded items you don’t want to stack on shelves.
Cost: $10–$20 at any home goods store.
Works in small reach-in closets where shelf space is tight.
Tip: use one for each category — one for jeans, one for gym wear, one for pajamas.
10. Install a Pull-Out Pants Rack
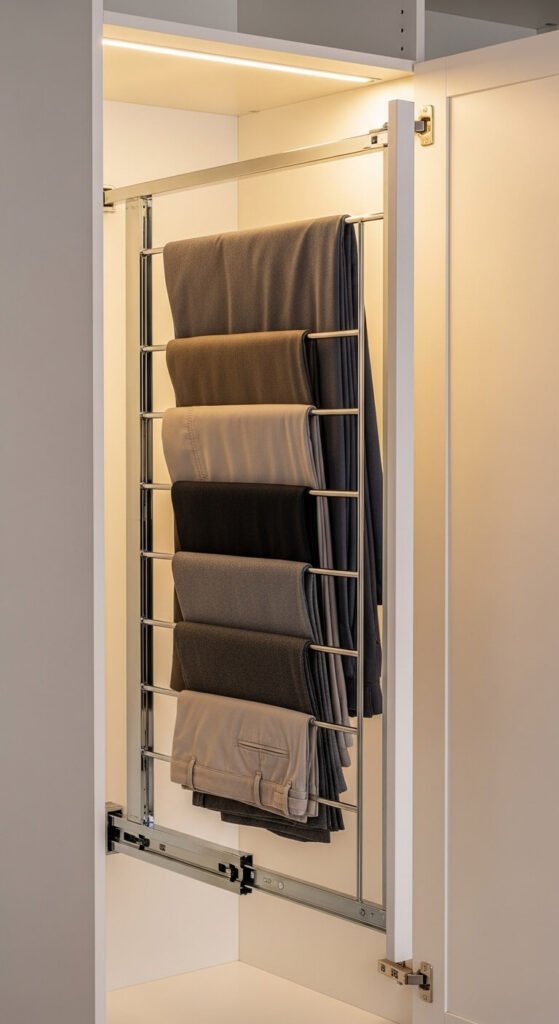
Folded pants get wrinkled. Hanging them takes too much rod space.
A pull-out pants rack mounts inside a cabinet or between two walls.
It slides out so you can see every pair at once, then tucks away.
Holds 10–20 pairs depending on the model.
Cost: $25–$60 depending on brand and size.
You can mount one inside an existing wardrobe with just a screwdriver.
Alternative: use over-door pant hangers with multiple rungs — similar effect, no installation.
11. Maximize Vertical Space With Floor-to-Ceiling Shelving

Most closets have 8–10 feet of ceiling height — and use maybe 6 of it.
Floor-to-ceiling shelving captures all of it.
Top shelves hold seasonal items, luggage, and rarely used bins.
Eye-level shelves stay active with daily-use clothing.
Lower shelves hold shoes and folded pants.
IKEA PAX systems go floor to ceiling and can be fully customized.
DIY option: buy simple 1×10 pine boards and wall brackets, cut to length, and paint them.
12. Use Labeled Bins for the Top Shelf
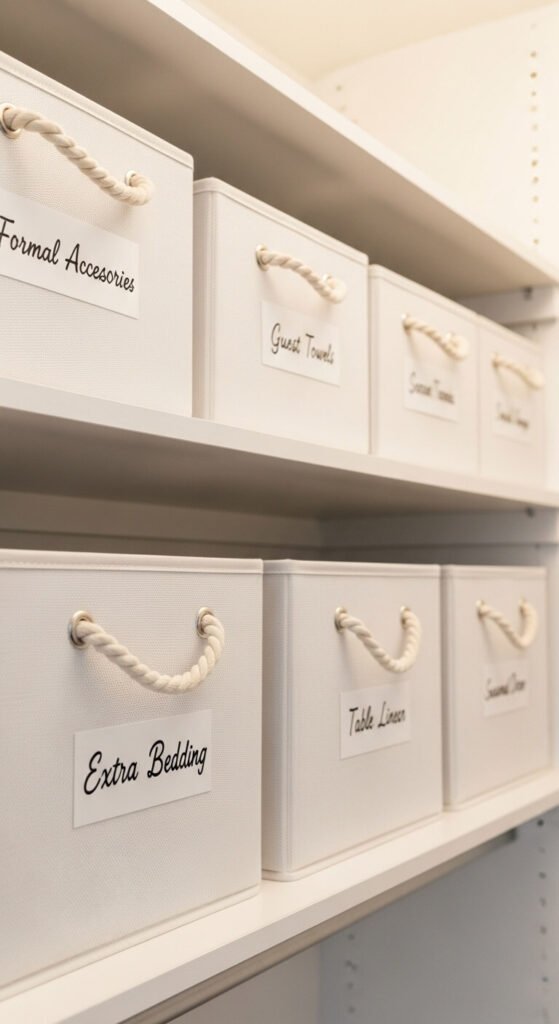
The top shelf is easy to ignore — and easy to waste.
Labeled bins make it a functional zone for rarely used but important items.
Use uniform bins so everything looks clean and intentional.
Label them: holiday decor, extra linens, out-of-season accessories.
Fabric bins are lightweight and easy to lift down.
Cost: $3–$8 per bin at IKEA or Target.
A single top shelf can hold 6–10 bins depending on size — that’s a lot of storage recovered from thin air.
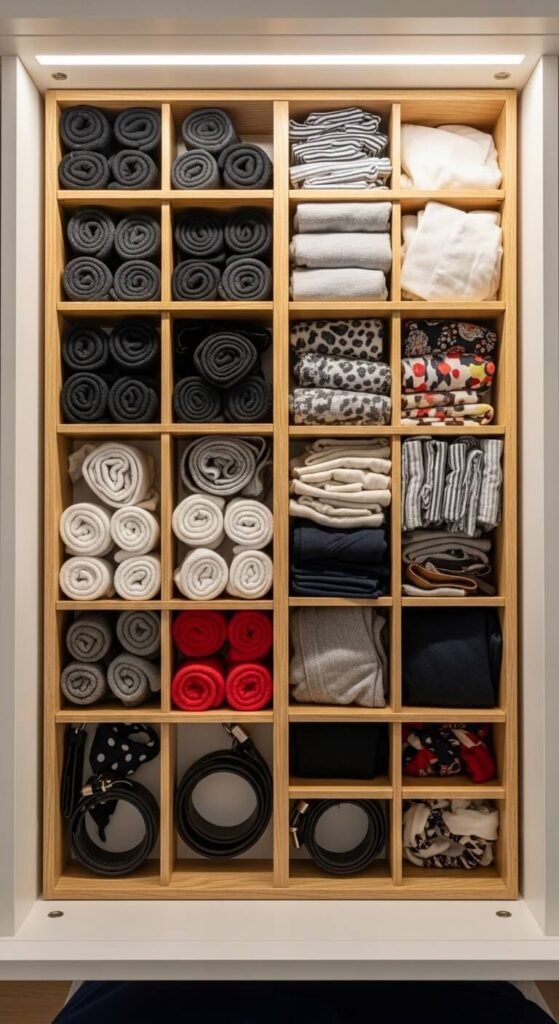
13. Add Drawer Dividers Inside Built-In Drawers

Drawers without dividers become black holes.
Drawer dividers break the space into logical zones so every item has a home.
Adjustable bamboo dividers expand to fit any drawer width.
Sort by category: socks, underwear, belts, ties.
This small change saves minutes every morning that add up fast.
Cost: $10–$20 for a set.
Fold items vertically (KonMari style) inside each section so you can see everything at a glance without digging.
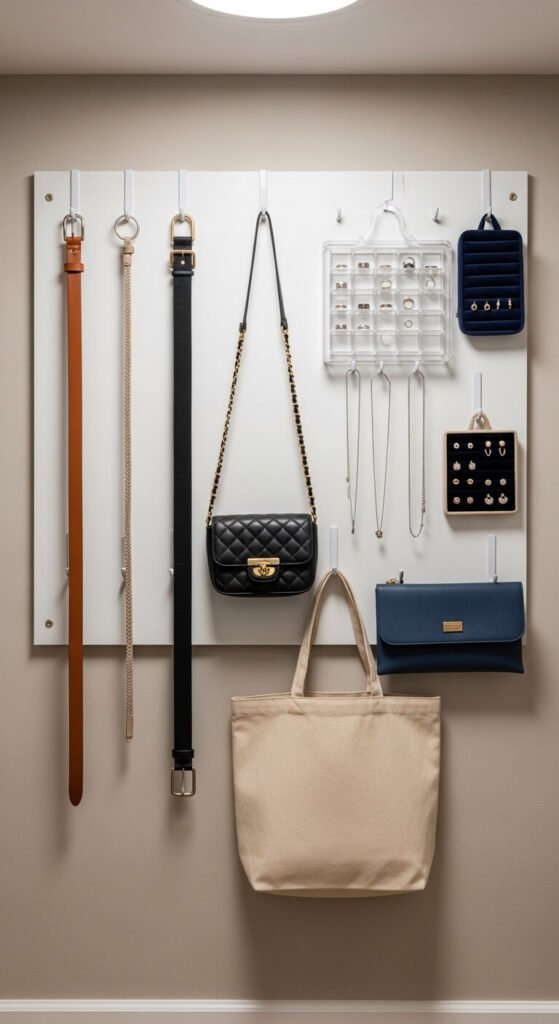
14. Hang Jewelry on a Wall-Mounted Frame
Jewelry piled in a bowl is jewelry you’ll never wear.
A wall-mounted jewelry organizer puts everything visible and accessible.
Frames with mesh backing, hooks, and small bars handle every jewelry type.
Mount it on the inside closet wall or the back of the door.
Necklaces hang untangled. Earrings pair up. Rings stay visible.
DIY version: stretch wire mesh across a picture frame and add cup hooks.
Total cost under $15. Takes 20 minutes.
15. Use Clear Stackable Shoe Boxes
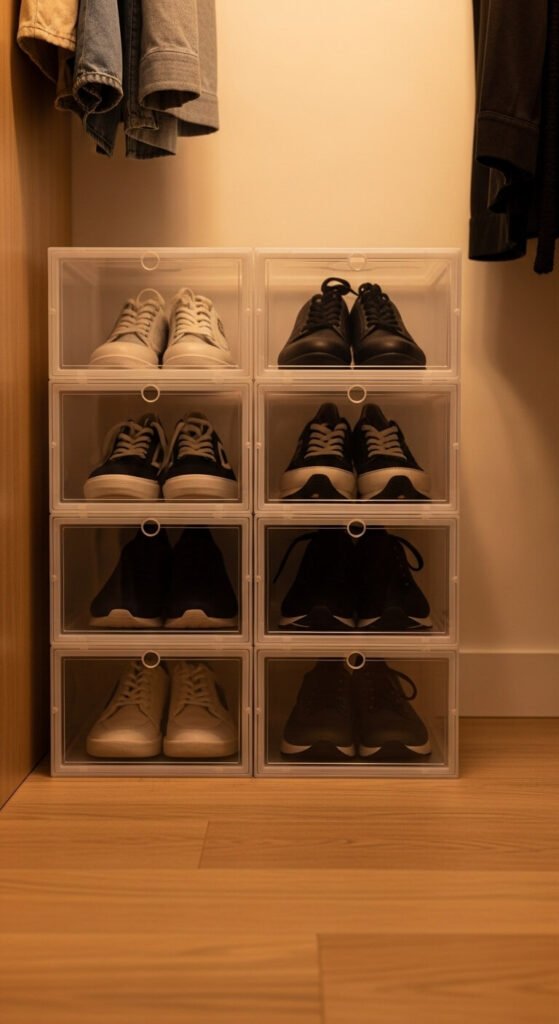
Shoes piled on the floor are a mess and a hazard.
Clear stackable shoe boxes solve this cleanly.
Each pair gets its own box. You can see exactly what’s inside.
Stack them up the wall to free floor space.
Cost: $1–$3 per box at dollar stores or IKEA.
They’re also great for protecting shoes and keeping dust off.
Tip: photograph each pair and tape the image to the front of the box for faster access without opening every one.
16. Mount a Belt and Tie Rack on the Wall or Door
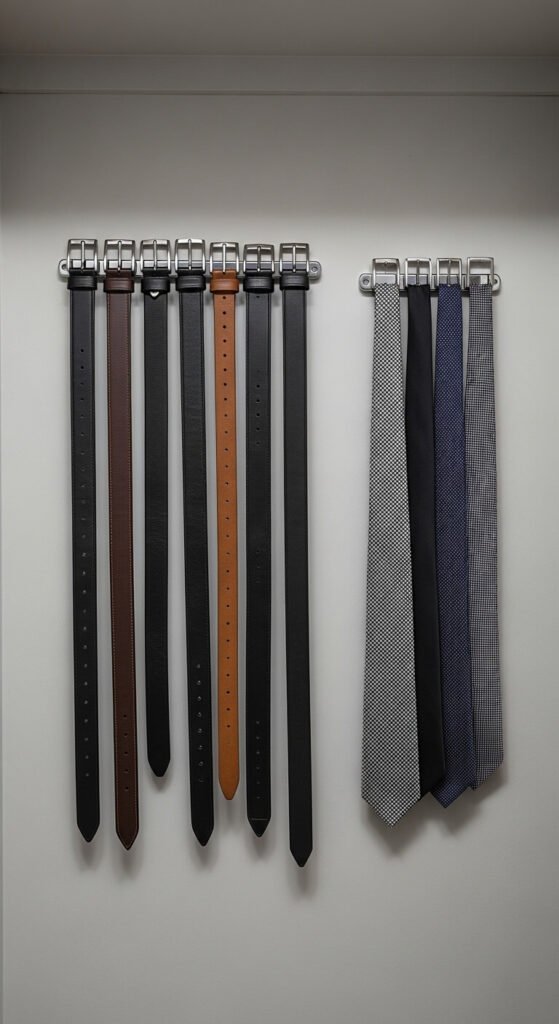
Belts and ties are the accessories most likely to live in a tangled pile.
A dedicated wall-mounted rack solves both problems at once.
Hooks are spaced so each item hangs flat and visible.
Mount it on the side wall or inside the door.
Cost: $8–$20.
You can DIY it with a strip of wood and cup hooks from a hardware store.
Alternate: a rotating tie rack that mounts to the rod is another space-efficient option that takes zero wall space.
17. Add a Built-In Bench With Shoe Storage Underneath
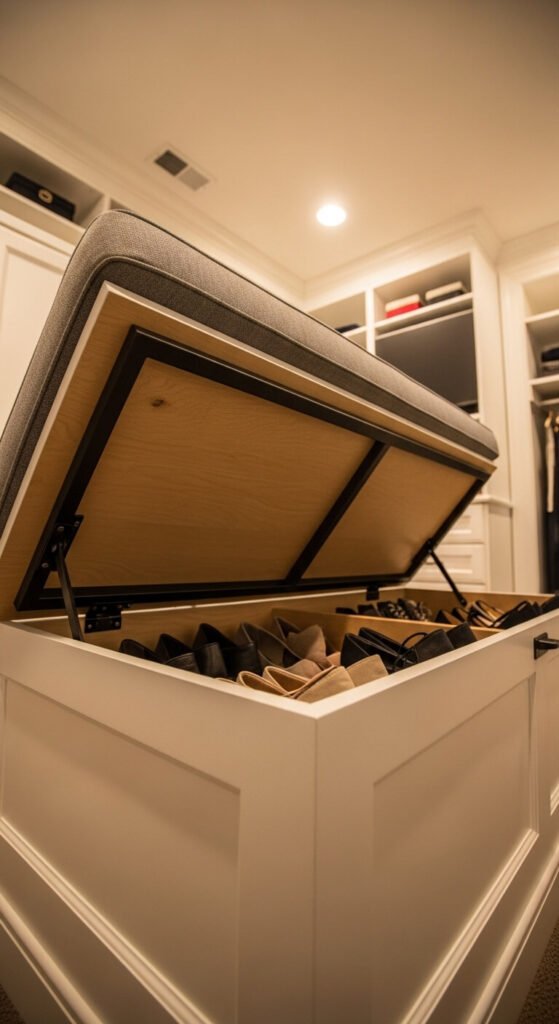
A seating bench in a walk-in closet pulls double duty.
Lift-top benches hide storage underneath — perfect for shoes, seasonal accessories, or gym gear.
You sit to put on shoes. You lift the lid to grab what’s inside.
Pre-built versions run $80–$200.
DIY option: build a simple box from plywood, add a piano hinge and foam cushion for under $50.
Fits in any closet wide enough to walk into and completely hides bulky, hard-to-store items.
18. Use Hooks to Hang Bags on the Wall
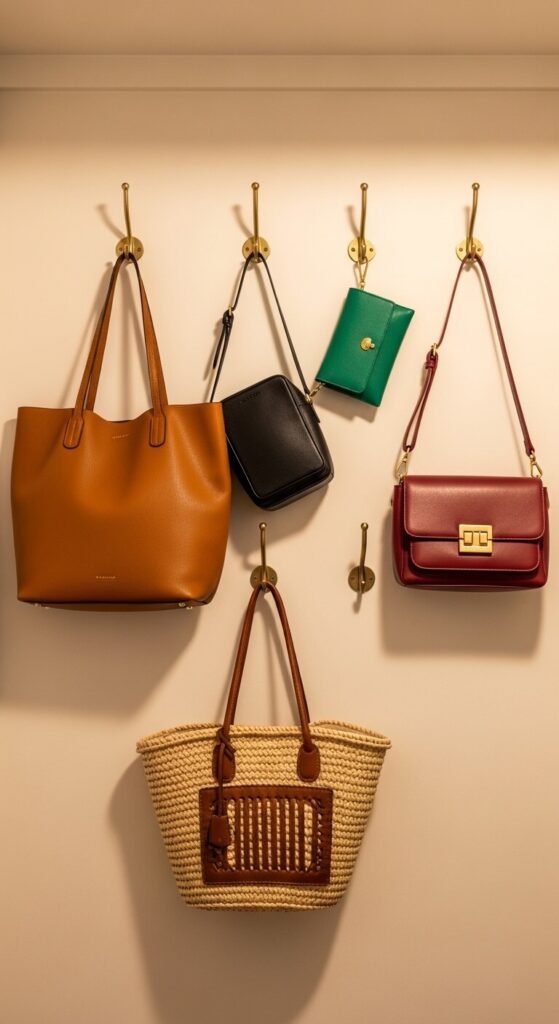
Bags are awkward. They don’t stack. They don’t fold.
Wall hooks are the cleanest solution.
Space them 6–8 inches apart and hang bags directly on the wall.
You see everything. You grab what you want.
Cost: $2–$10 per hook depending on style.
Go for brushed brass or matte black for a designer look on a budget.
Pro tip: use a rail system (like IKEA’s Skådis) with interchangeable hooks so you can reconfigure anytime without patching holes.
19. Fold Clothes Vertically Instead of Stacking
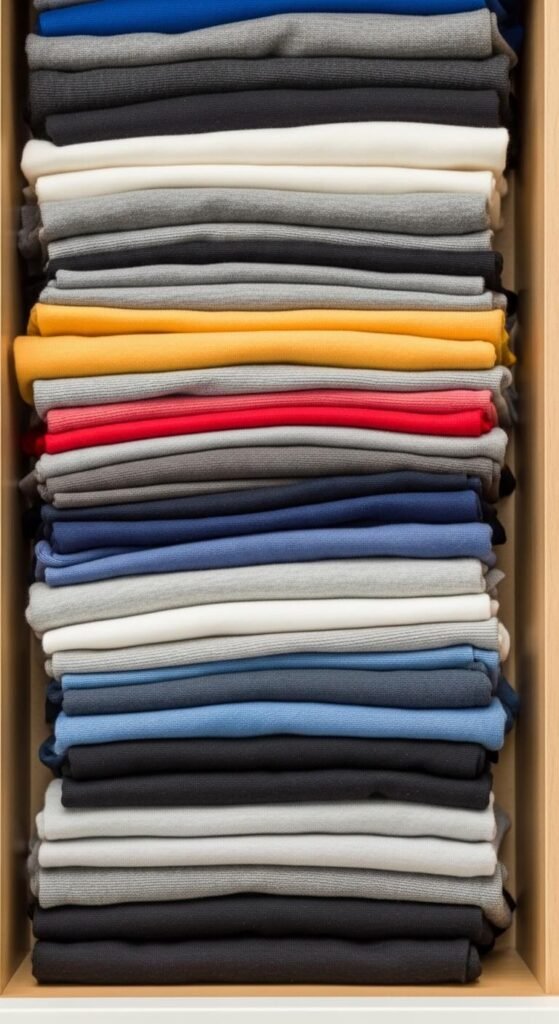
This isn’t a product — it’s a technique. And it changes everything.
Vertical folding means you stand clothes on edge instead of stacking them flat.
Stacked piles require digging. Vertical rows let you see everything at once.
T-shirts, jeans, leggings — all work beautifully this way.
How to do it: fold each item into a small rectangle, then fold once more so it stands on its own edge.
No cost. Takes one afternoon to convert your entire drawer system. The results are immediate and satisfying.
20. Install a Pull-Out Laundry Hamper
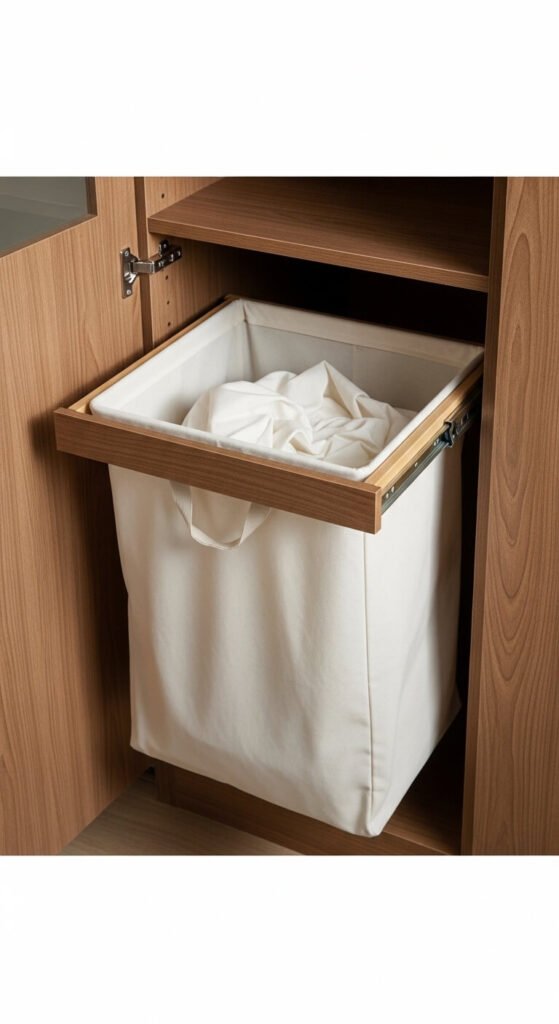
Floor hampers take up square footage. They’re visible. They tip over.
A pull-out hamper tucks inside a cabinet or closet section.
Slide it out to toss in laundry. Slide it closed and it disappears.
Great for tight spaces where a freestanding hamper blocks walking.
Kits start around $40 at hardware stores.
DIY version: mount a canvas bag on a wooden frame with drawer slides — a weekend project for under $25 with basic tools.
21. Use a Rotating Shoe Carousel for a Corner Space
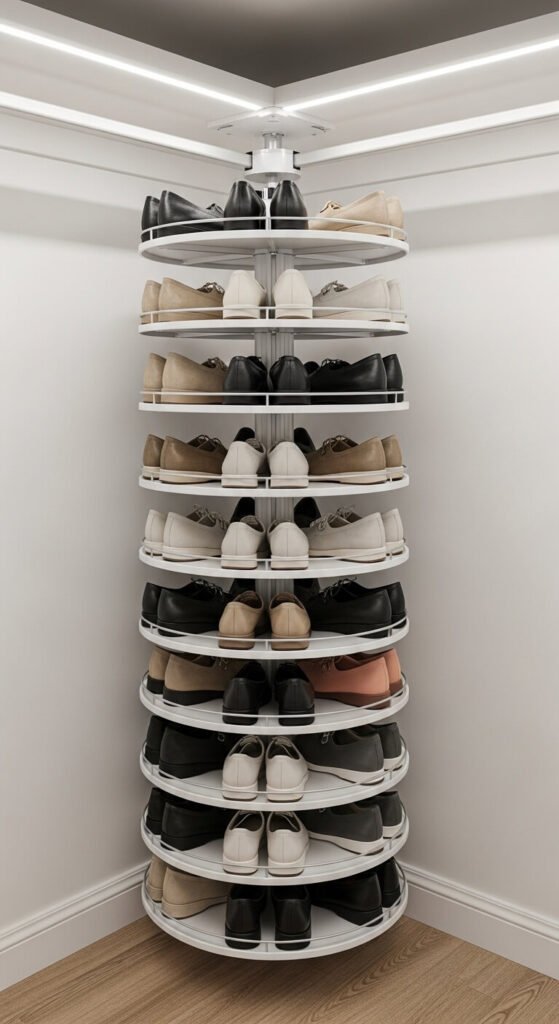
Corner spaces in a walk-in closet are notoriously awkward to use.
A rotating shoe carousel solves that completely.
It spins 360 degrees and stacks vertically, so you access every pair easily.
Carousels hold 20–50 pairs depending on height.
Cost: $60–$150 depending on tiers.
It turns dead corner space into the most efficient shoe storage in the room.
Budget alternative: a simple corner shelf unit with angled shelves achieves a similar result for around $30–$40.
22. Create a Dedicated Seasonal Swap System
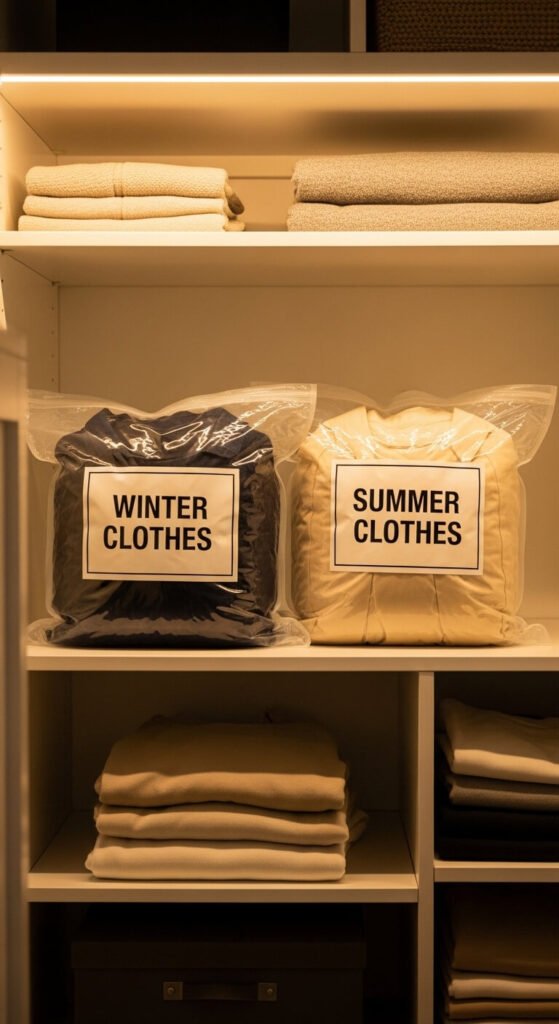
Not everything you own needs to be accessible year-round.
A seasonal swap system means winter coats don’t crowd your summer wardrobe.
Store out-of-season clothes in vacuum storage bags — they compress to a fraction of the original size.
Label them clearly: Winter Tops, Heavy Sweaters, Summer Dresses.
Store them on the top shelf or under the bed.
Cost: $15–$25 for a set of bags.
Twice a year, swap what’s active. Your daily closet shrinks to only what you actually wear right now.
23. Use a Scarf and Accessory Organizer Ring
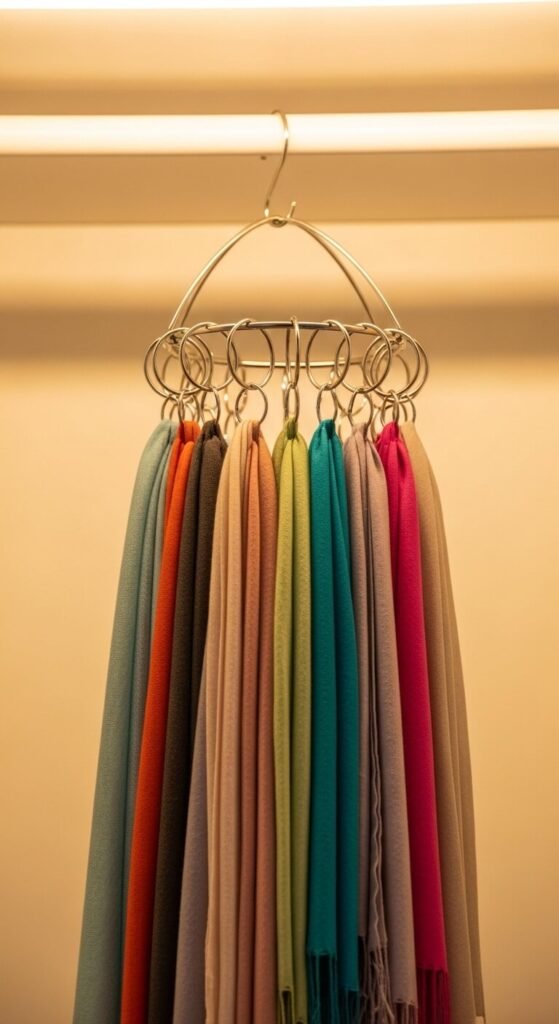
Scarves are the accessories most likely to end up in a pile.
A multi-loop ring hanger solves this with one $5–$10 purchase.
It’s a single ring with 6–12 loops that hangs from your rod.
Thread each scarf through a loop.
Everything hangs flat, visible, and separate.
Takes one hanger’s worth of rod space but holds a dozen scarves.
DIY version: zip-tie shower curtain rings to a single ring hanger — same concept for under $3.
24. Add Under-Shelf Hanging Baskets
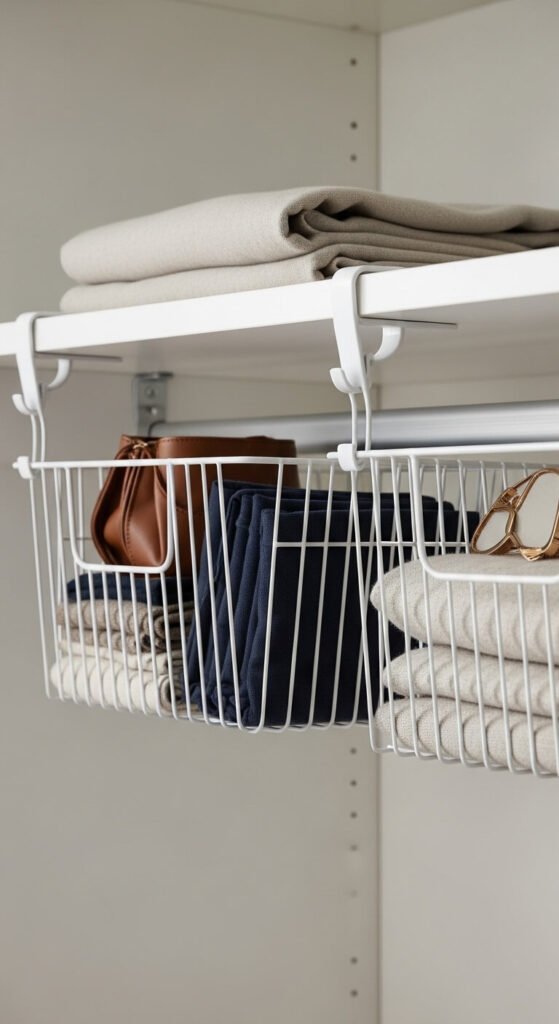
The space directly under a shelf is usually wasted.
Under-shelf hanging baskets clip on to any wire or wood shelf and hang below.
They add a whole extra storage tier without any installation.
Use them for socks, underwear, accessories, or small folded items.
Cost: $10–$20 for a set of two or three.
They’re especially useful in linen closets or pantries where deep shelves leave a lot of air above the stored items.
Clip on. Fill up. Done.
25. Use a Rotating Tie and Belt Organizer
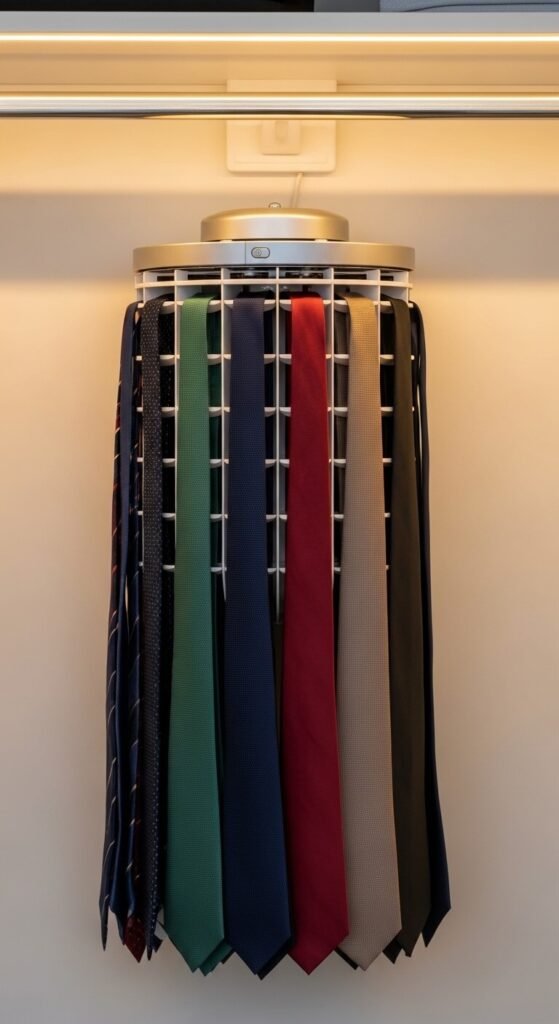
If you have more than five ties or belts, this is a game changer.
A rotating organizer holds 20–40 items in individual slots and spins so you can browse the whole collection.
Wall-mounted versions run on batteries or manual rotation.
Cost: $20–$60 depending on model.
You see every item face-on, without pulling anything off a hook.
Budget version: use a chain of S-hooks on one closet rod hook — thread each tie through a ring and hang them in sequence for a DIY version under $5.
26. Build a DIY Closet Island With a Rolling Cart
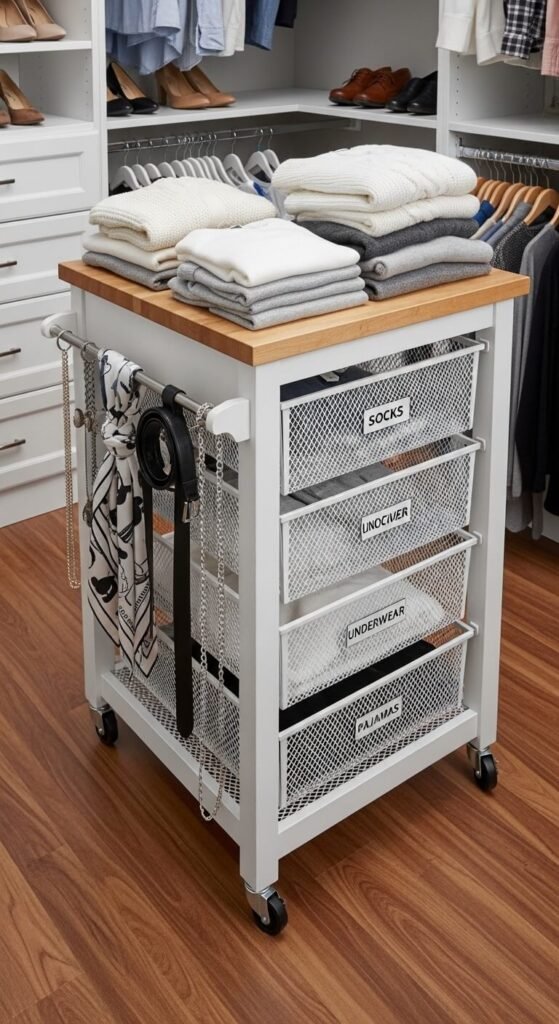
A closet island adds vertical and horizontal storage in the center of a walk-in.
You don’t need custom woodwork.
An IKEA kitchen cart (like the RÅSKOG) rolls in, provides drawers, and costs around $40–$60.
Use the top surface for fold-and-go items.
Drawers hold accessories or overflow folded clothes.
Add a towel bar to the side for hanging bags.
Bonus: it’s on wheels, so you can roll it out when you need more floor space.
27. Install a Mirror That Doubles as a Storage Cabinet
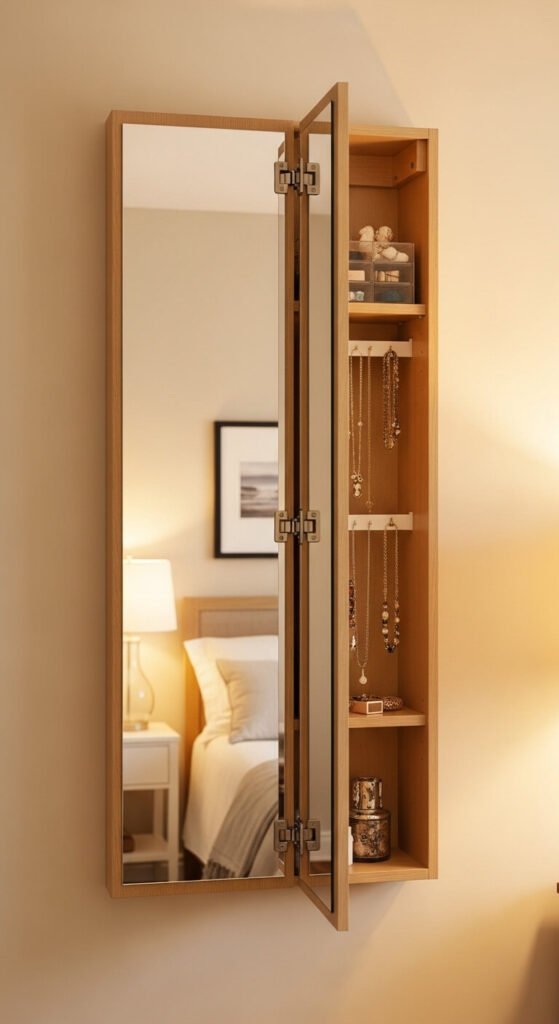
This is the ultimate two-in-one for tight closets.
A mirror-front cabinet looks like a standard full-length mirror on the outside.
Open it and there’s a shallow cabinet with hooks and shelves inside.
Perfect for jewelry, watches, sunglasses, and small accessories.
Cost: $80–$200 for pre-built units.
DIY version: mount a frame-style mirror on piano hinges over a shallow box cabinet you build from plywood.
You get a full-length mirror and a hidden cabinet in one footprint. No extra space required.
Conclusion
Every single system on this list works — but the real shift is treating your closet as active, functional real estate instead of a place to hide things. You don’t need a perfect closet to start. Pick one idea from this list and do it this week. Add a second rod. Swap your hangers. Clip on a basket. Small changes stack up fast, and before long you’ll have a closet that actually works the way your life does. The space was always there — you just needed a better plan for it.