
Ceilings get overlooked more than any other surface in the home. We paint walls, style shelves, and swap out rugs, but the fifth wall usually stays plain white. That’s a missed opportunity. A little color, texture, or pattern overhead can change how a whole room feels without touching the floor plan. Whether you rent or own, whether you have a weekend or a whole season, there’s a ceiling treatment here that fits your space and your wallet. These ideas range from a can of paint to a full beam install, so pick what matches your time and budget, and let your ceiling finally do some work.
1. Paint It a Bold Color
Skip white. A saturated ceiling color turns an ordinary room into something with mood. Try deep forest green in a den or a warm terracotta in a dining room. This is one of the cheapest updates you can make. One gallon of paint and a weekend afternoon is all it takes. Use a flat or matte finish to hide small imperfections. Tape off the edges carefully for clean lines. Start with a small accent room, like a powder bath, before committing to a bigger space. It’s a low-risk, high-impact way to test bold design without major cost.
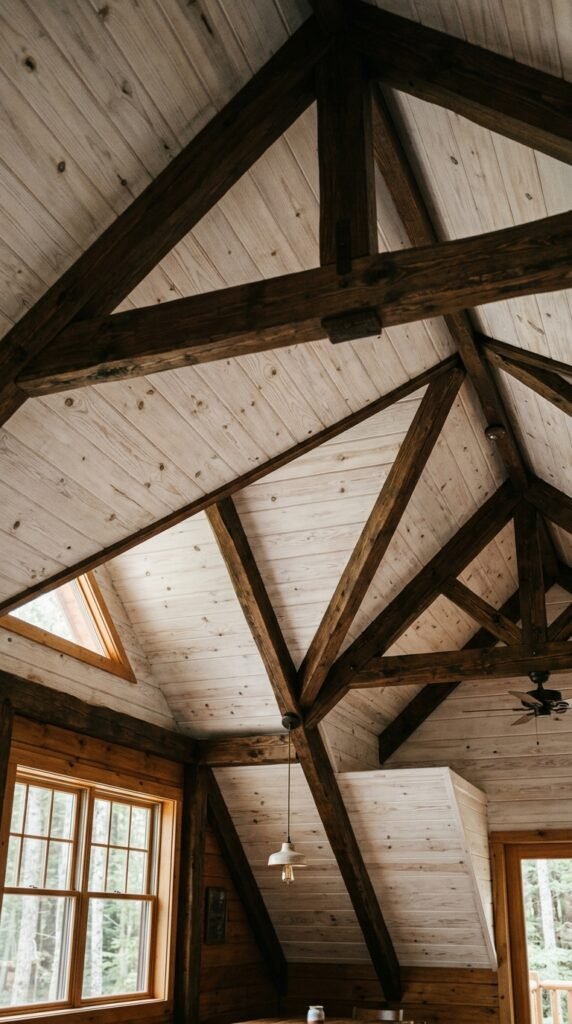
2. Add Wood Beams for Warmth
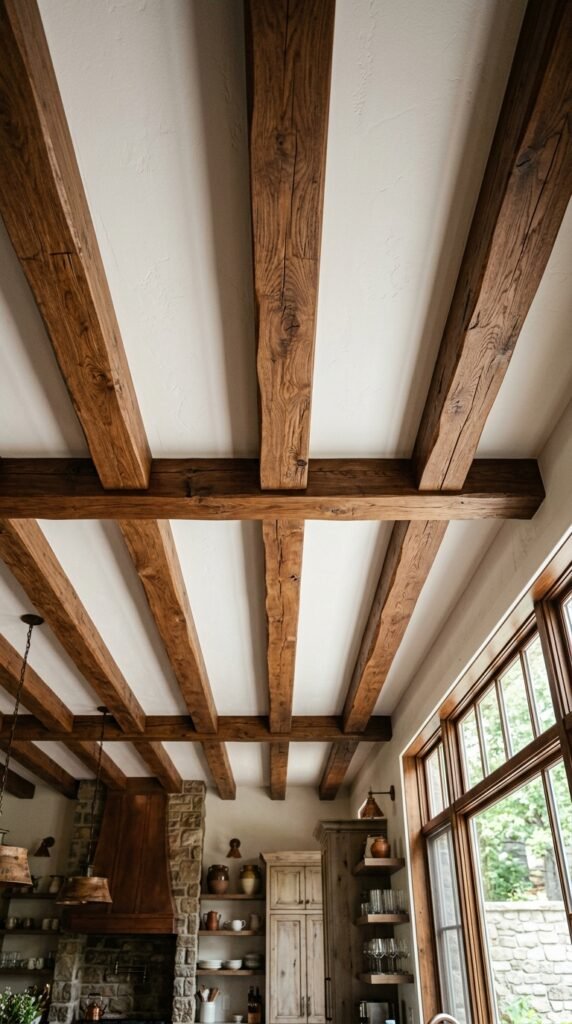
Faux wood beams give a room instant character. You can find lightweight polyurethane beams that look like real timber but install in an afternoon. They mount with adhesive and screws, so no heavy lifting is required. Paint them a rich walnut tone or leave them raw for a rustic cabin feel. Space them evenly across the ceiling for a symmetrical look. This works especially well in kitchens and living rooms with vaulted ceilings. Budget versions run under $50 per beam at most home stores. It’s a weekend project that makes a plain ceiling feel custom-built.
3. Try a Wallpapered Ceiling
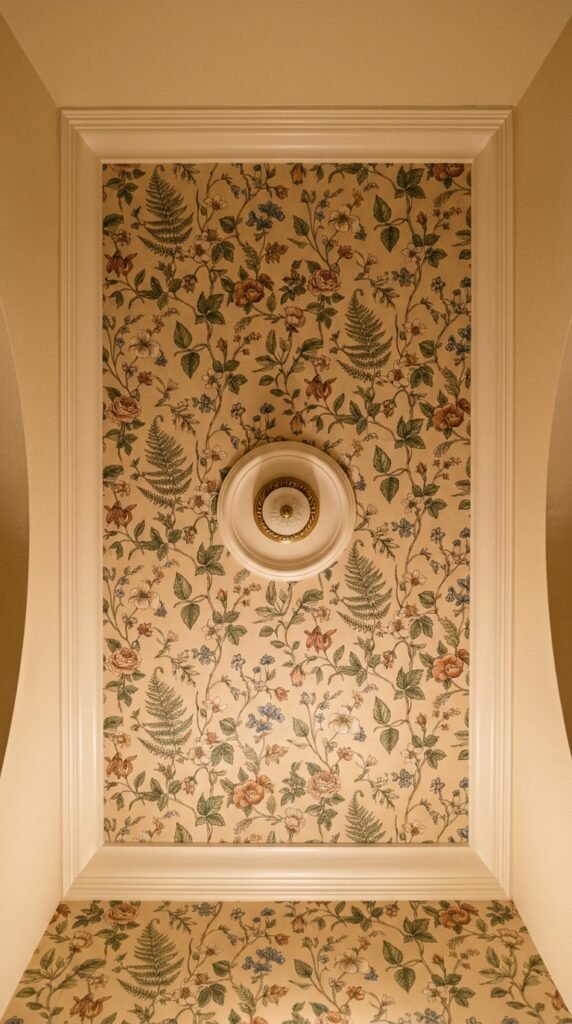
Wallpaper isn’t just for walls anymore. A patterned ceiling adds drama without repainting the whole room. Choose a small-scale print for a subtle effect, or go bold with florals in a powder room. Peel-and-stick options make this beginner-friendly and renter-approved. Measure twice before cutting to avoid wasted rolls. Start in a small space like a closet or nook to build confidence. This treatment pairs well with plain white walls, letting the ceiling carry the personality. Expect to spend under $100 for a small room using budget peel-and-stick rolls.
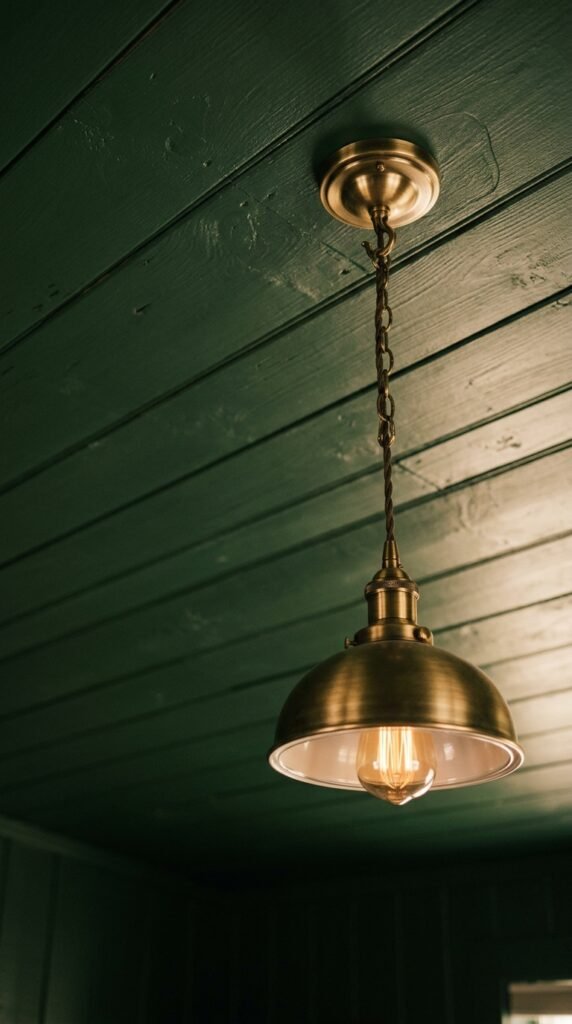
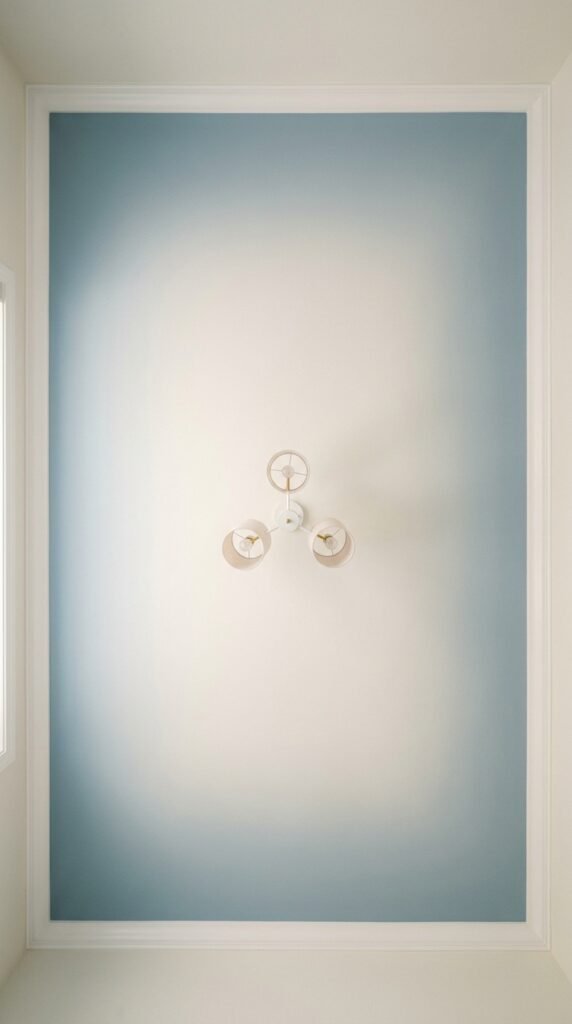
4. Install a Statement Light Fixture
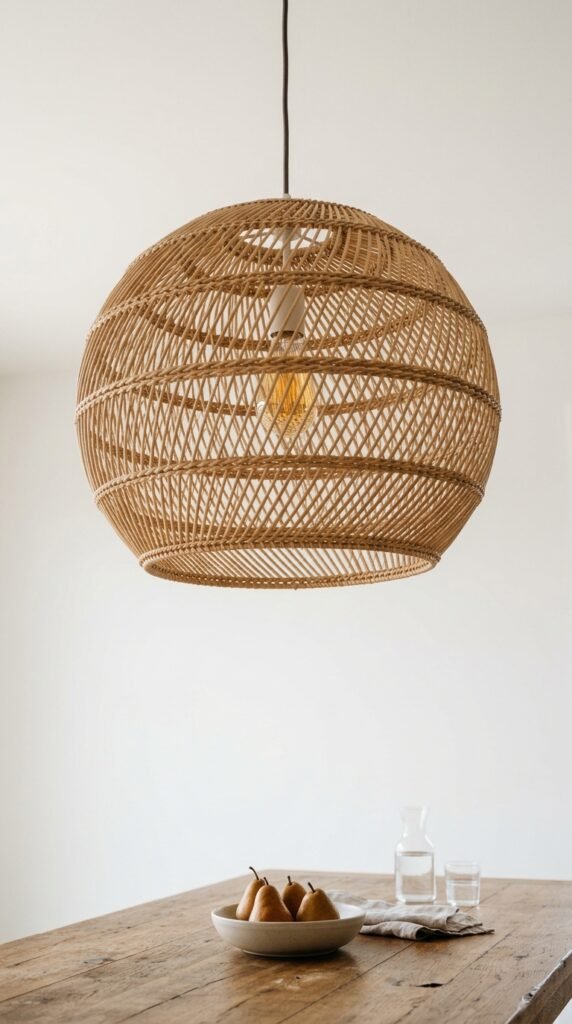
Sometimes the ceiling treatment is really about what hangs from it. A sculptural pendant light or oversized chandelier draws the eye up instantly. Choose a fixture in brass, matte black, or woven rattan depending on your style. Center it over a dining table or reading nook for maximum impact. Swapping a fixture is a beginner electrical task if you already have wiring in place, or hire an electrician for an hour. Thrift stores and marketplace listings often have unique vintage fixtures for a fraction of retail price. One great light can redefine an entire room.
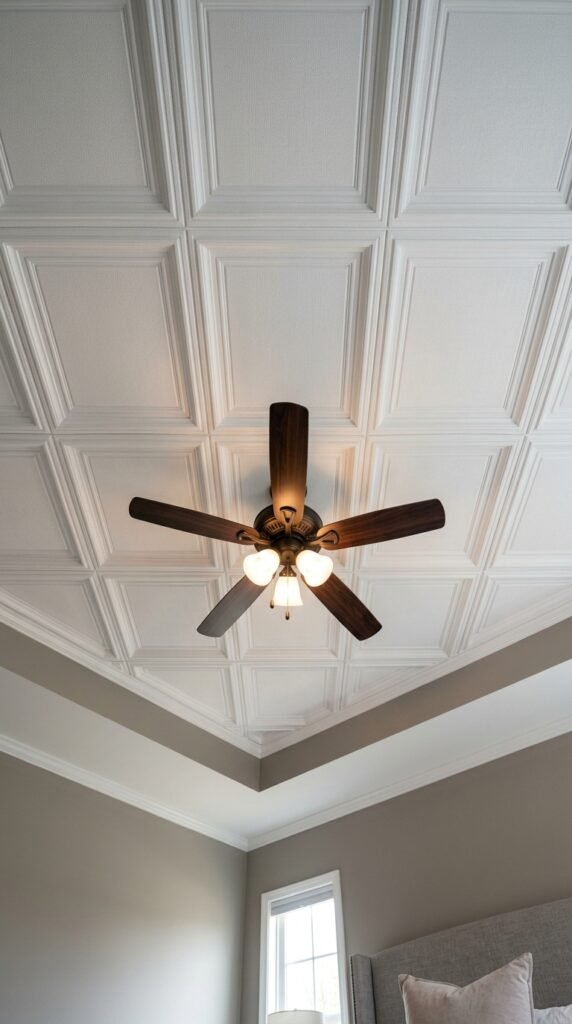
5. Go for a Tray Ceiling Effect
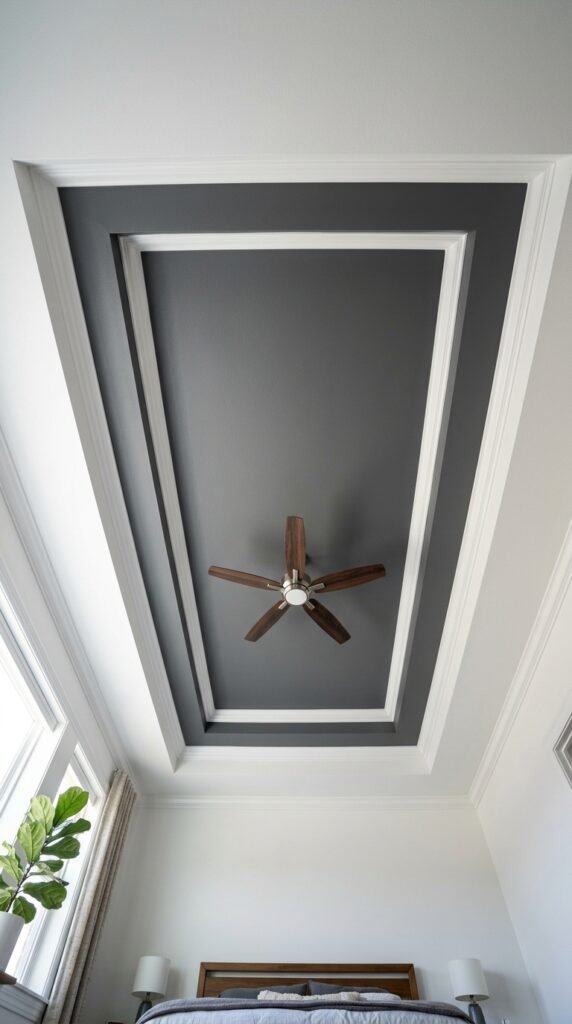
A tray ceiling adds depth using layered trim, even in a room with standard flat ceilings. Build a simple recessed frame with MDF trim boards around the ceiling perimeter. Paint the inset a slightly darker or lighter shade than the surrounding trim to create shadow lines. This trick works in bedrooms and dining rooms to make ceilings feel taller. It’s a moderate DIY project, best tackled with a miter saw and some patience. Budget for trim materials around $150 to $300 depending on room size. The payoff is a custom, builder-grade look for a fraction of the cost.
6. Stencil a Geometric Pattern
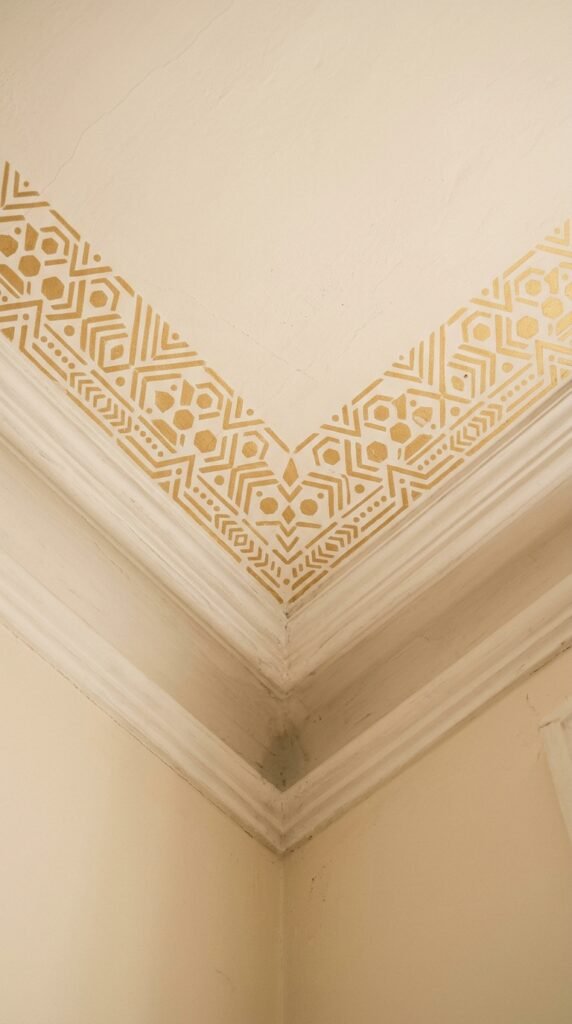
Stencils let you paint intricate designs without freehand skill. Choose a geometric stencil in a soft metallic or contrasting paint color for the ceiling. This works beautifully in entryways, nurseries, or reading nooks. Tape the stencil securely and work in small sections to avoid bleeding. A foam roller gives cleaner edges than a brush. This project costs under $40 for stencil and paint supplies. It takes a weekend but delivers a hand-painted, artisan look. Start with a corner test patch to get comfortable with the technique before covering the full ceiling.
7. Add Exposed Beams with String Lights

Combine beams with a soft lighting layer for a cozy, café-like glow. Wrap warm white string lights around exposed wood beams for ambient light after dark. This works especially well on patios, sunrooms, or converted attics. Use battery-operated or plug-in string lights to avoid rewiring. Secure them with small clear clips instead of nails to protect the wood. This is a budget-friendly add-on to any beam installation, usually under $30. The soft glow makes the ceiling feel intentional and finished, not just structural.
8. Whitewash Wood Paneling
If your ceiling already has wood paneling, don’t rip it out. Whitewashing brightens dark, dated wood while keeping its texture. Mix white paint with water at a one-to-one ratio and brush it on, wiping away excess for a translucent finish. This technique costs almost nothing if you already have leftover paint. It works great in basements, cabins, or older homes with knotty pine ceilings. Test a small hidden section first to check the color result. The wood grain still shows through, giving texture without the heavy, dark look of the original finish.
9. Install a Metallic Tin Ceiling Tile Look
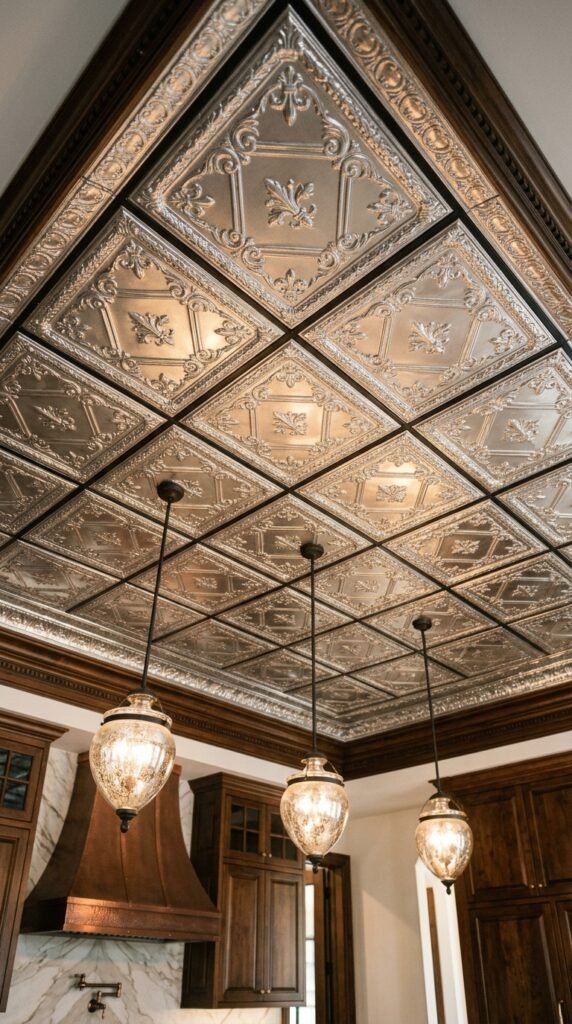
Pressed tin ceiling tiles bring vintage charm to kitchens and dining rooms. Look for lightweight faux tin panels that mimic the pattern without the weight or cost of real metal. These often come as PVC tiles that glue directly onto drywall. A small kitchen ceiling might only need a dozen tiles, keeping the budget under $150. Paint them silver, copper, or classic white to match your kitchen hardware. This treatment adds old-world texture that pairs surprisingly well with modern cabinetry and lighting.
10. Paint a Soft Ombre Gradient
An ombre ceiling blends two or three paint shades for a dreamy gradient effect. Start dark near the corners and blend lighter toward the center, or fade from wall color into white. Use a large sponge or blending brush to soften the transition zones while the paint is still wet. This works beautifully in nurseries or bedrooms for a calming effect. It only requires a few sample-size paint cans, keeping costs low. Practice the blending technique on cardboard first. The result feels custom and artistic without hiring a professional muralist.
11. Use Peel-and-Stick Ceiling Tiles
Foam or PVC peel-and-stick tiles transform a plain ceiling in a single afternoon. They come in coffered, tin-look, or textured patterns and stick directly over existing drywall or popcorn texture. This is one of the most renter-friendly options on this list since most peel off cleanly later. A standard bedroom ceiling might cost under $80 in materials. Clean the ceiling surface first so the adhesive holds properly. Work in small sections, starting from the center of the room outward. This is a great starter project if you’ve never touched a ceiling before.
12. Add a Skylight or Sun Tunnel
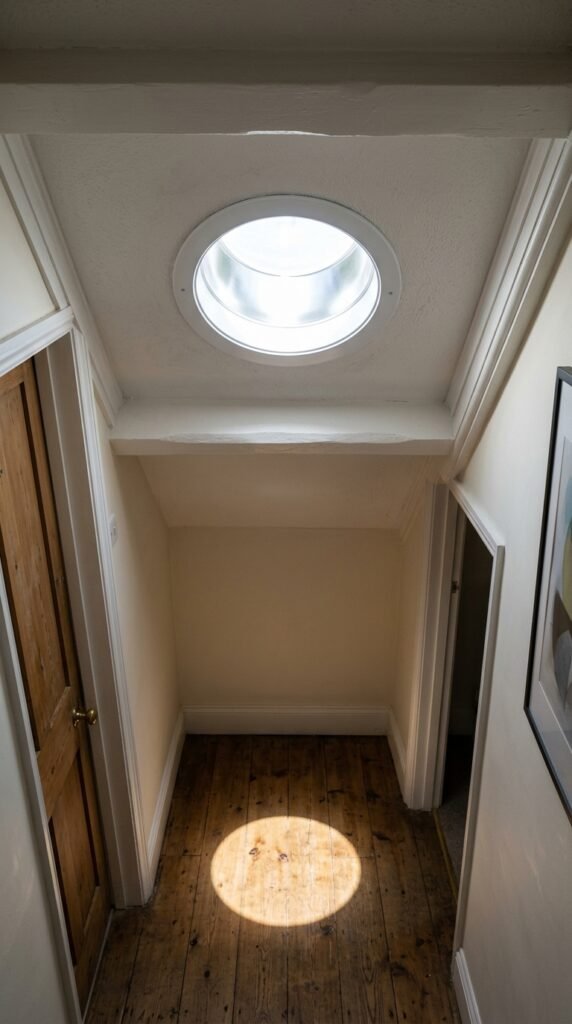
Natural light overhead changes a room more than any paint color can. A sun tunnel is a smaller, more affordable alternative to a full skylight installation. It uses a reflective tube to channel daylight from the roof into a small ceiling fixture. Many kits install in a single day without major structural changes. This works especially well in dark hallways, bathrooms, or closets. While pricier than paint or wallpaper, it adds real value and daily comfort. Get quotes from a few local installers to compare pricing before committing.
13. Try a Textured Plaster Finish

Skip smooth drywall for a hand-troweled plaster texture on the ceiling. This adds subtle shadow and movement, especially under natural light. Ready-mix textured plaster products let you DIY this without hiring a plasterer. Apply in thin layers with a trowel, working in small sections to control the texture pattern. This technique shines in Mediterranean or farmhouse-style homes. Budget for around $50 to $100 in materials for a standard room. The uneven, artisanal surface catches light differently throughout the day, giving the ceiling a handmade quality.
14. Paint the Ceiling to Match the Walls
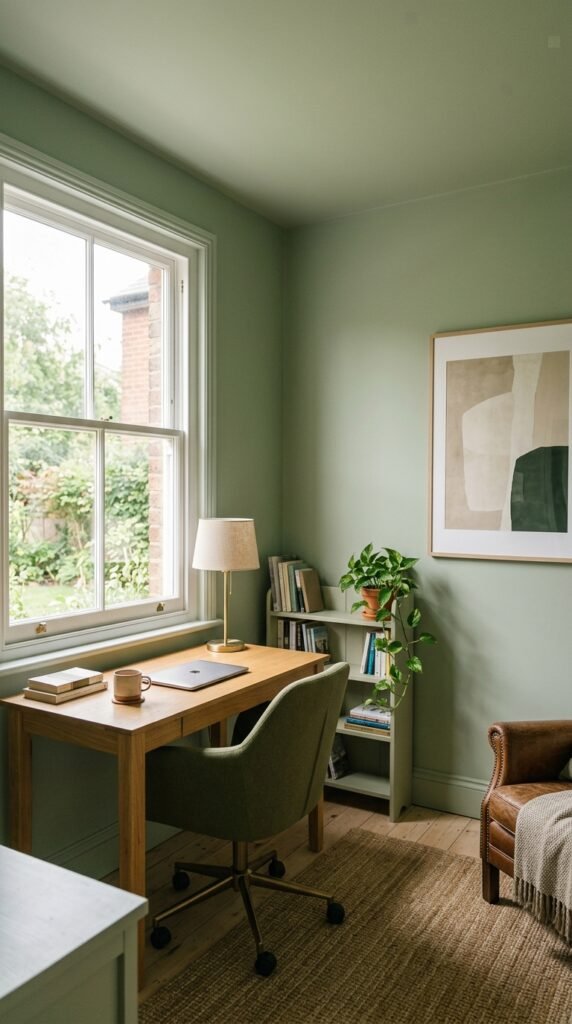
Instead of contrast, try monochrome continuity. Painting the ceiling the exact same color as the walls makes a small room feel taller and more cohesive. This trick is especially useful in rooms with low ceilings or awkward angles, since it removes the visual break where wall meets ceiling. It’s also the simplest project on this list, requiring zero extra planning beyond your wall paint. Use the same sheen for the smoothest transition. This works particularly well in home offices, reading nooks, and small bedrooms.
15. Hang a Canopy of Fabric
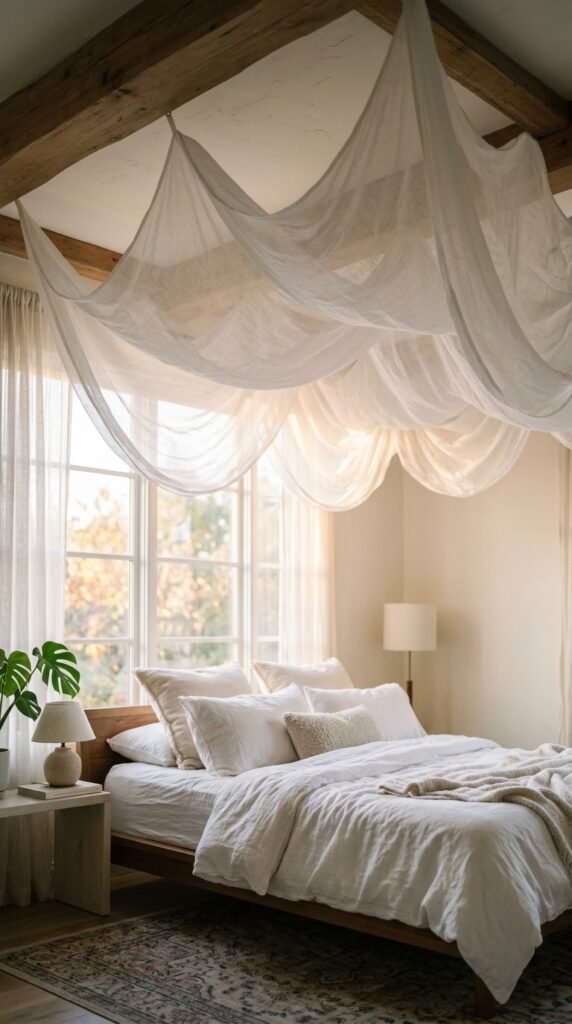
Drape lightweight fabric across the ceiling for a soft, tented effect. This is popular for bedrooms, nurseries, and even outdoor patio spaces. Use sheer curtains or muslin fabric attached to ceiling hooks at a few key points, letting the material fall in gentle waves. This is a no-nail-required project if you use tension rods or command hooks. Fabric canopies cost under $40 for a basic version. They soften harsh overhead lighting and add a romantic, layered feel without any permanent changes to the ceiling itself.
16. Install Board and Batten Overhead
Board and batten isn’t just for walls anymore. Applying vertical or grid battens to the ceiling creates architectural lines and shadow play. Use thin MDF strips, cut to size, and attach them with construction adhesive and finish nails. Paint the battens and ceiling the same color for a seamless, sculptural look. This project takes a weekend and costs under $200 for a standard-sized room. It works especially well in dining rooms and entryways where you want a formal, tailored feel without full millwork.
17. Add a Mural or Hand-Painted Scene
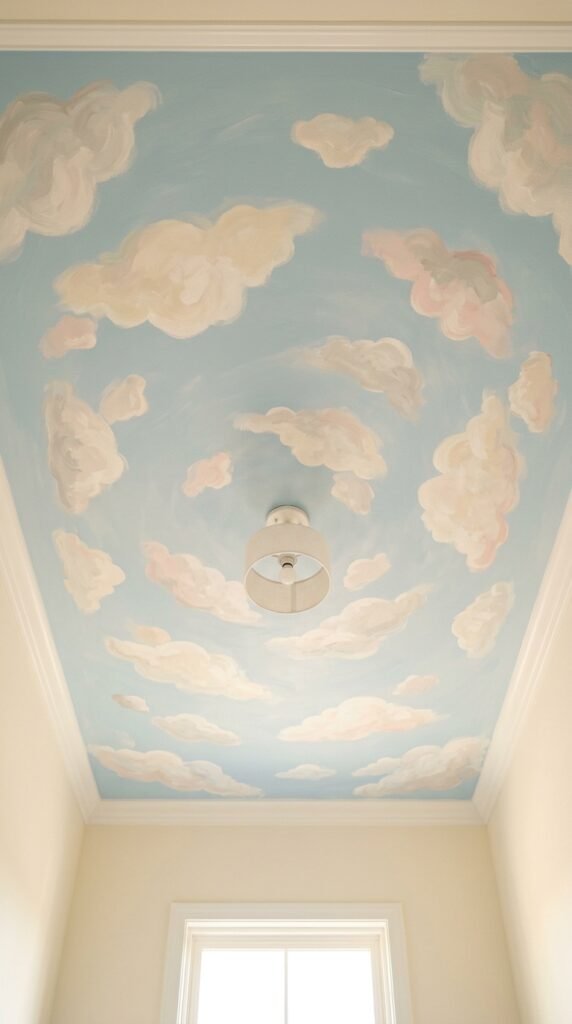
A ceiling mural turns a room into a conversation piece. Think soft clouds, botanical branches, or an abstract wash of color. You don’t need professional painting skills. Use a projector to trace a simple design onto the ceiling, then fill it in with craft paint. This works beautifully in nurseries, reading corners, or powder rooms. Start with a small, simple motif rather than a complex scene for your first attempt. Total cost usually stays under $50 in paint supplies. The result feels personal and one-of-a-kind.
18. Use High-Gloss Paint for Drama
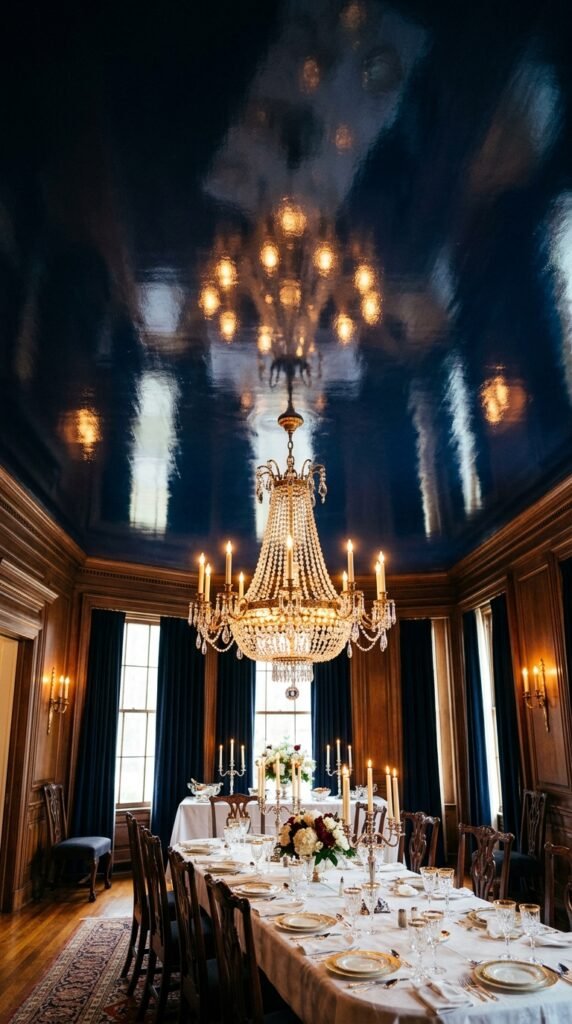
Glossy ceilings reflect light and add a polished, luxe feel to any room. Choose a high-gloss finish in a deep color like navy, black, or emerald for maximum drama. Gloss paint requires more prep work, so sand and prime the ceiling first for a smooth result. This treatment works best in formal dining rooms or powder baths where a bold statement feels appropriate. It costs about the same as regular paint, just with extra prep time. The reflective sheen bounces candlelight and lamp light beautifully after dark.
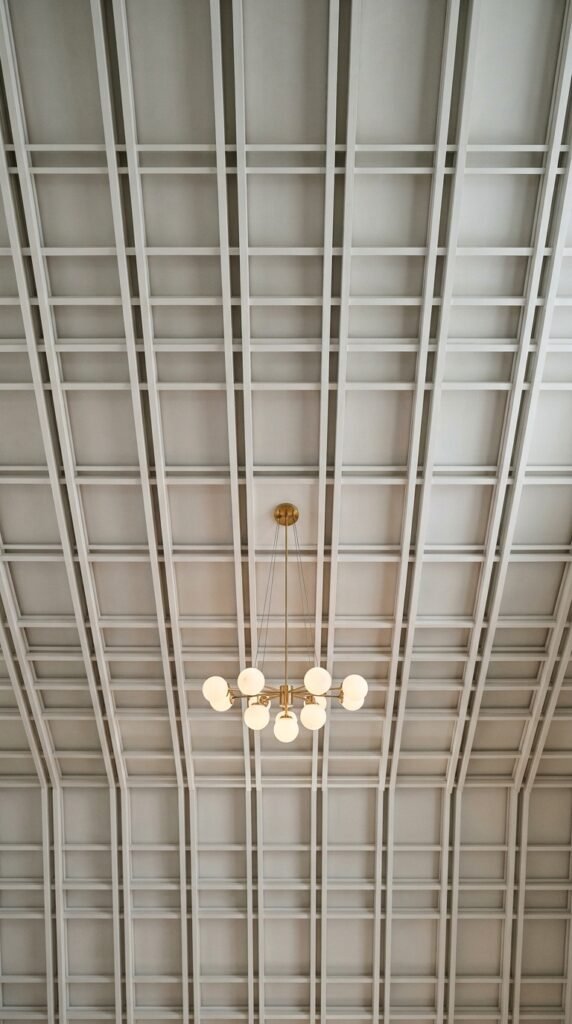
19. Create a Faux Beam Grid Pattern
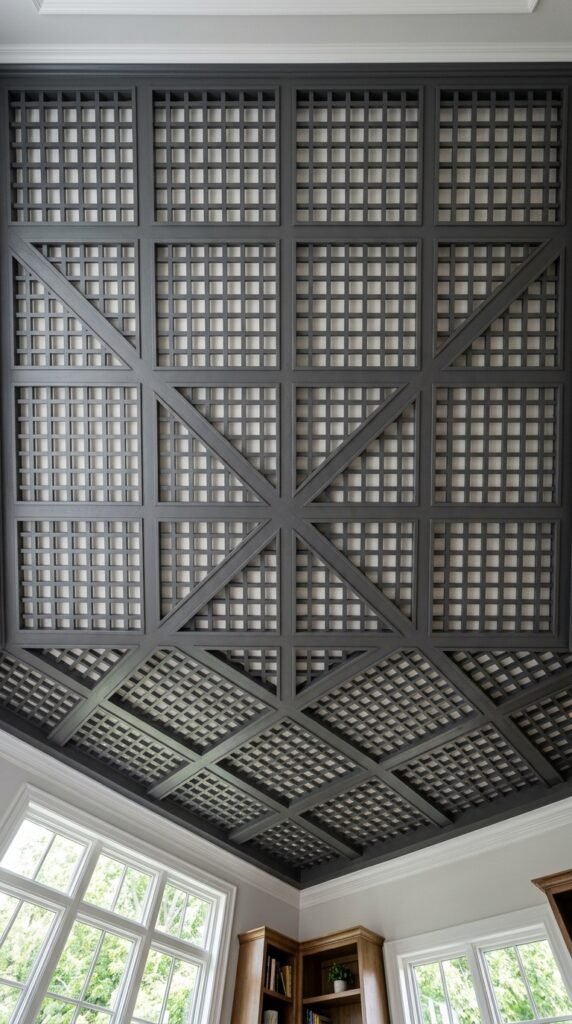
Instead of scattered beams, arrange thin wood strips in a grid across the ceiling for a coffered look without the cost of real coffers. Use inexpensive furring strips from the lumber yard, sanded and painted or stained. Attach them directly to the ceiling in a symmetrical pattern using adhesive and finish nails. This project suits kitchens, offices, and dens. Budget around $100 to $250 depending on room size and strip spacing. The grid pattern adds structure and rhythm, making a plain ceiling feel architecturally intentional.
20. Add Recessed Cove Lighting
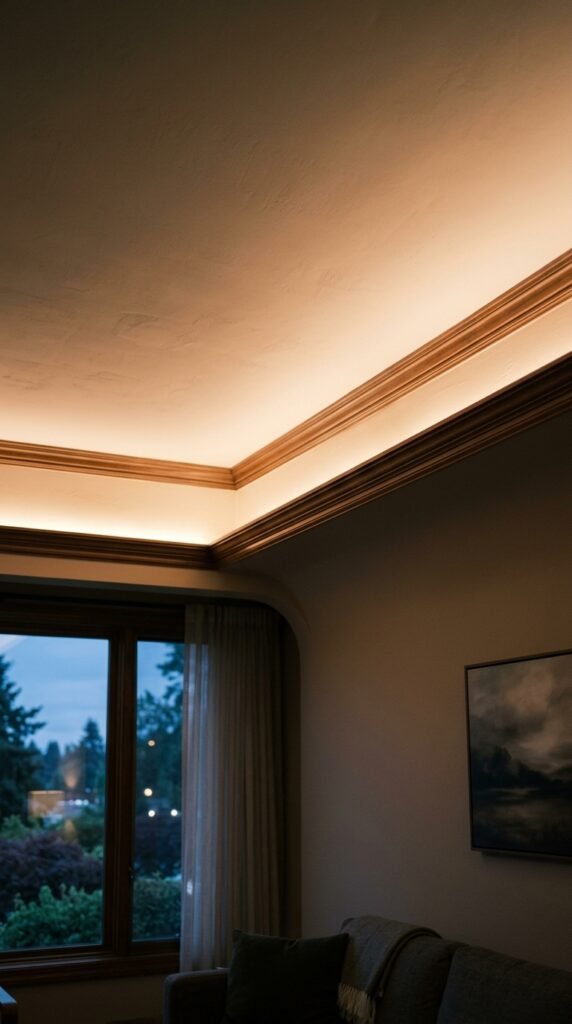
Cove lighting hides LED strips in a recessed ledge near the ceiling edge, casting a soft upward glow. This technique makes ceilings feel higher and adds a warm ambient layer after dark. Simple LED strip kits with adhesive backing make this a manageable DIY project, no electrician required for battery or plug-in versions. Install the trim ledge first using thin wood or foam crown molding, then tuck the light strip behind it. This works well in bedrooms and living rooms. Total cost typically stays under $75 for a standard room.
21. Try a Chevron or Herringbone Wood Pattern
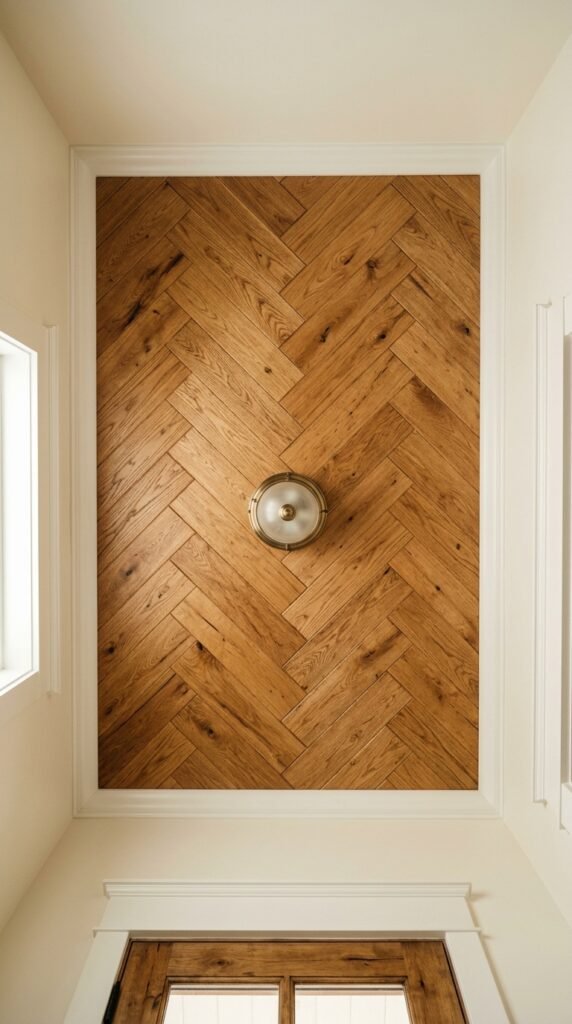
Take wood ceiling treatments a step further with a chevron or herringbone layout. Use thin wood planks or even leftover flooring samples, cut at matching angles and arranged in a repeating zigzag. This adds serious visual texture to a small entryway or reading nook ceiling. It’s a more advanced DIY project requiring careful measuring and cutting, so budget extra time. Stain the wood a warm honey tone or paint it white for a coastal feel. The pattern draws the eye across the whole ceiling in a way flat paint never could.
22. Add a Pop of Color in a Nook or Alcove
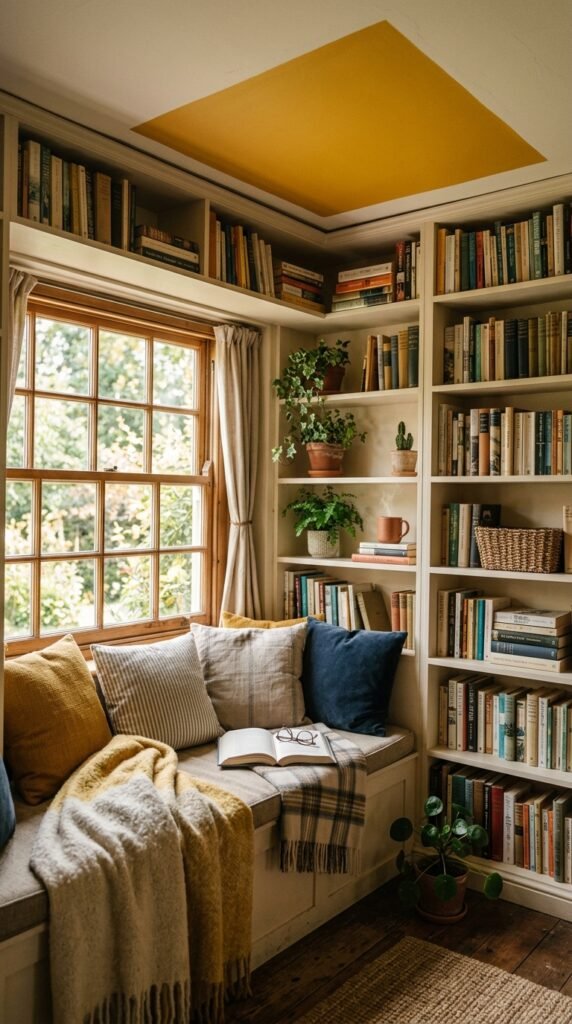
You don’t need to commit to an entire room. Paint just the ceiling of a window nook, closet, or reading alcove in a bold accent color. This lets you experiment with drama in a contained space. It’s one of the fastest projects on this list, often finished in under an hour with sample-size paint. This trick works especially well in built-in bookshelf nooks or bay window seats. The small scale keeps the look playful instead of overwhelming, and it’s easy to repaint later if your taste changes.
23. Use Textured Wallpaper for Subtle Dimension
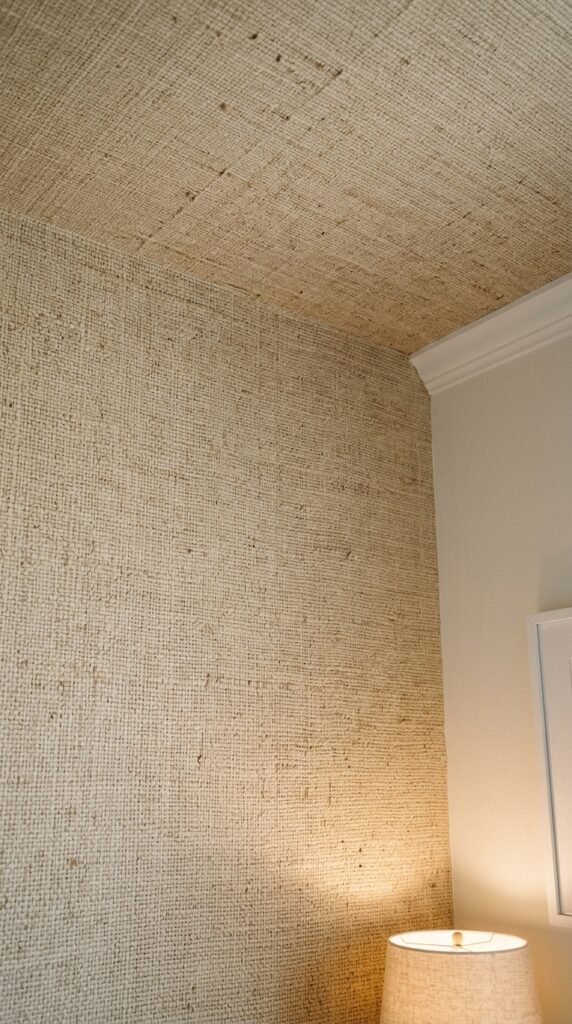
Beyond patterned prints, look for grasscloth or textured wallpaper for the ceiling. These add tactile depth without a busy visual pattern, so they suit bedrooms and living rooms where you want texture but not a loud statement. Grasscloth comes in soft neutral tones that pair with almost any wall color. Peel-and-stick textured options make this beginner-friendly. Budget around $60 to $120 depending on room size. The subtle woven texture catches light differently throughout the day, adding quiet interest overhead.
24. Install a Ceiling Medallion Around the Light Fixture
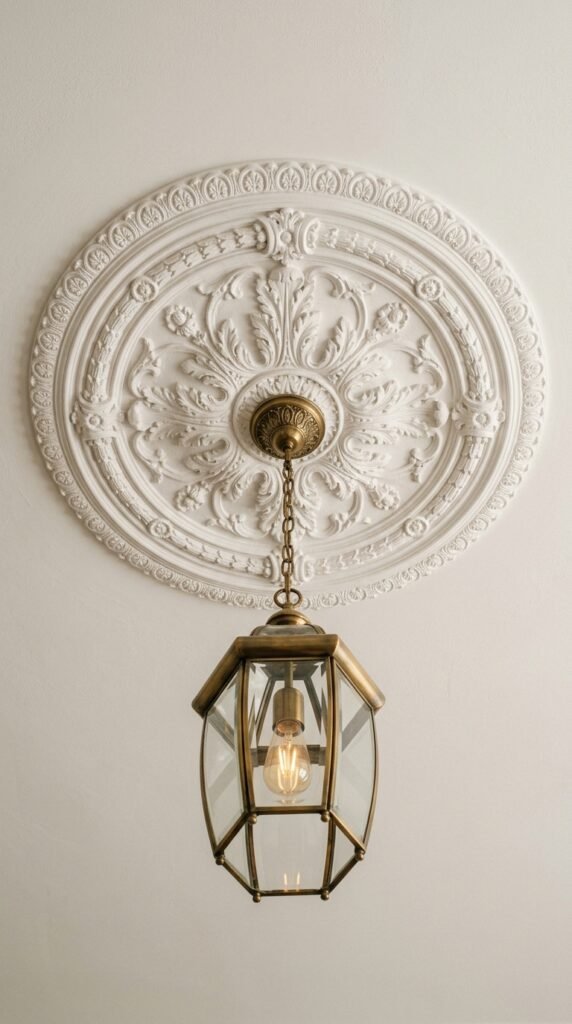
A ceiling medallion adds ornamental detail around a light fixture or fan for a formal, finished look. These come in lightweight polyurethane and install with adhesive in under an hour. Choose a simple round medallion for a subtle upgrade, or an ornate floral design for a more traditional room. Paint it to match the ceiling or pick out details in a metallic accent. This is one of the most affordable projects here, often under $30. It’s a small detail that makes a light fixture look custom-installed rather than builder-basic.
25. Paint Ceiling Beams a Contrasting Black
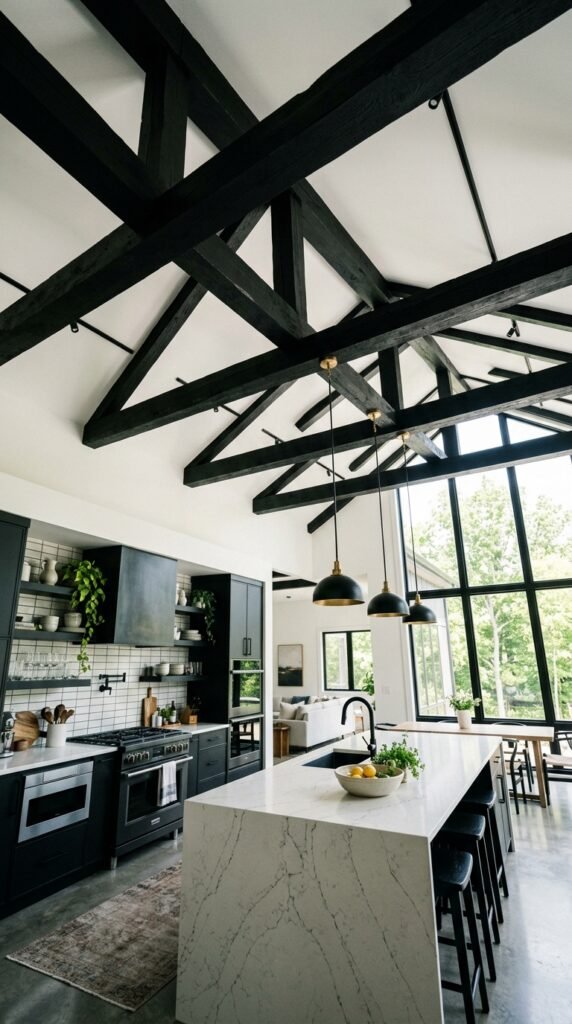
If you already have exposed structural beams, skip the natural wood look and paint them matte black instead. This creates strong architectural lines against a white ceiling, giving a modern farmhouse or industrial feel. Sand and prime the beams first if they were previously stained. This project costs mostly in paint and time, usually under $50 for a standard room. It works especially well in kitchens and open-concept living spaces. The contrast makes the beam structure feel like a deliberate design choice rather than leftover framing.
26. Add a Woven Rattan or Bamboo Panel Accent
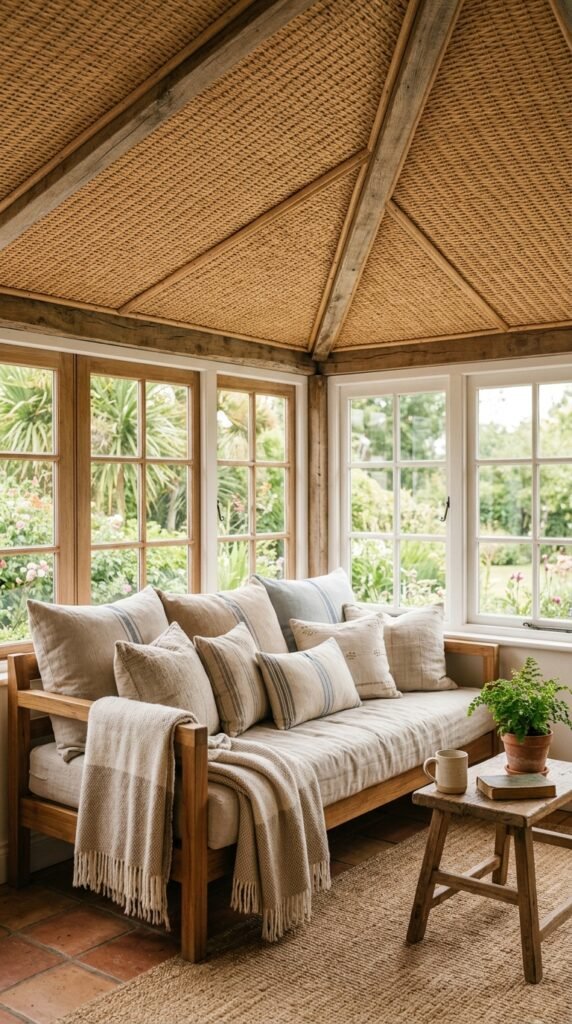
For a coastal or relaxed feel, attach woven rattan panels to a section of the ceiling, like above a bed or breakfast nook. These lightweight panels come pre-woven and cut to size, attaching with adhesive or a thin wood frame. They add natural texture and warmth without heavy construction. This works well in bedrooms, sunrooms, and covered patios. Budget around $80 to $150 depending on panel size and coverage area. The organic texture pairs beautifully with linen bedding, rattan furniture, and soft neutral color palettes.
Conclusion
Your ceiling has more potential than a fresh coat of white paint. From a single stenciled corner to a full beam installation, these treatments prove that the fifth wall deserves the same care as your floors and walls. Start small if you’re testing a new style, or commit to a full room if you’re ready for a change. Whatever budget or skill level you’re working with, there’s a project on this list that fits. Look up, pick a favorite, and give your ceiling the attention it’s been missing.